


Your vehicle deserves only genuine OEM Toyota parts and accessories. To ensure reliability, purchase Toyota part # 13053-20010 CAMSHAFT Sub-Assembly. It is sometimes referred to as Toyota Camshaft. Our Toyota parts and accessories are expedited directly from authorized Toyota dealers strategically located all across the U.S. and are backed by the manufacturer's 12 month, 12,000 mile warranty. OEM Toyota parts are the best for restoring your vehicle to factory condition performance. This part fits 1995-1999 Toyota Avalon, 1993-2004 Toyota Camry, 1998-2001 Toyota Sienna, 1999-2003 Toyota Solara.
Affordable, reliable and built to last, Toyota part # 1305320010 CAMSHAFT Sub-Assembly stands out as the smart option. ToyotaPartsDeal.com is your prime online source with the biggest and best selection of genuine Toyota parts and accessories at giant discounted prices. We have the OEM Toyota parts and accessories you need at the wholesale prices. ToyotaPartsDeal.com has you covered no matter what type of Toyota vehicle you drive. For detailed Toyota parts information, click here.
Make sure this part fits your vehicle
Toyota 13053-20010 CAMSHAFT Sub-Assembly
1993-2004 Toyota 1305320010
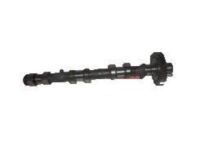


- Part DescriptionCamshaft Sub-Assy, NO.3
- Part Name Code13053
- Replaces13053-0A020, 13053-0A010
- ManufacturerToyota
$291.68 MSRP: $418.26 1
You Save: $126.58 (31%)
Ships in 1-3 Business Days
Product Specifications
Brand Genuine Toyota Part Name Code 13053 Manufacturer Part Number 13053-20010 Part Description Camshaft Sub-Assy, NO.3 Other Names Camshaft Manufacturer Note (J) Item Dimensions 21.4 x 3.4 x 2.9 inches Item Weight 4.50 Pounds Condition New Fitment Type Direct Replacement Replaces 13053-0A020, 13053-0A010 Manufacturer Toyota SKU 13053-20010 Warranty This genuine Toyota part is guaranteed by Toyota's factory warranty. Shipping & Return Shipping Policy Return Policy Warning: California’s Proposition 65Vehicle Fitment
Year Make Model Trim & Engine Important vehicle option details 1995-1999 Toyota Avalon XL, XLS|6 Cyl 3.0L 1MZFE; 1MZFE; MCX10L-AEPGKA, MCX10L-AEPGKK, MCX10L-AEPNKA, MCX10L-AEPNKK, MCX10L-AESGKA, MCX10L-AESGKK, MCX10L-AESNKA, MCX10L-AESNKK 1993-2004 Toyota Camry CE, DX, LE, SE, XLE|6 Cyl 3.0L 1MZFE; 1MZFE; MCV10L-AEPDKK, 1MZFE; MCV20L-AEPDKK, 1MZFE; MCV20L-CEMDKA, MCV10L-AEPGKA, MCV10L-AEPNKA, MCV10L-AEPNKK, MCV10L-AEPSKA, MCV10L-CCPNKA, MCV10L-CCPNKK, MCV10L-CCPSKA, MCV10L-CEPDKK, MCV10L-CEPGKA, MCV10L-CEPNKA, MCV10L-CEPNKK, MCV10L-CEPSKA, MCV10L-CWPNKA, MCV10L-CWPNKK, MCV20L-AEPDKK, MCV20L-AEPGKA, MCV20L-AEPGKK, MCV20L-AEPNKA, MCV20L-CEMDKA, MCV20L-CEMNKA, MCV20L-CEPDKK, MCV20L-CEPGKA, MCV20L-CEPGKK, MCV20L-CEPNKA, MCV20L-CEPNKK, MCV30L-AEAGKA, MCV30L-AEANKA, MCV30L-AEASKA, MCV30L-AEPGKA, MCV30L-AEPNKA, MCV30L-AEPSKA, MCV30L-CEAGKA, MCV30L-CEANKA, MCV30L-CEASKA, MCV30L-CEPGKA, MCV30L-CEPNKA, MCV30L-CEPSKA 1998-2001 Toyota Sienna CE, LE|6 Cyl 3.0L 1MZFE; 1MZFE; MCL10L-GFSDKA, MCL10L-GFSDKK, MCL10L-GFSGKA, MCL10L-GFSGKK, MCL10L-PFSDKA, MCL10L-PFSDKK, MCL10L-PFSGKA, MCL10L-PFSGKK, MCL10L-SESDKA, MCL10L-SESDKK 1999-2003 Toyota Solara 6 Cyl 3.0L 1MZFE; 1MZFE; MCV20L-GCMNKA, 1MZFE; MCV20L-GCPNKA, MCV20L-GCMNKK, MCV20L-GCPNKA, MCV20L-GCPNKK, MCV20L-GKPNKA, MCV20L-GKPNKK
Customer Questions & Answers
- Q:Does it fit my car? Posted by ToyotaPartsDeal Specialist
- A:You can Select Your Vehicle to check if 13053-20010 fits your vehicle.Posted by ToyotaPartsDeal Specialist
- Q:How to remove and reinstall camshafts on V6 engine for 2002 through 2008 Toyota Solara and 2002 through 2006 Toyota Avalon? Posted by Customer
- A:Before initiating this procedure, acquire two 6 x 1.0 mm bolts measuring 16 to 20 mm in length, referred to as service bolts. Start by positioning the engine at Top Dead Center (TDC), then proceed to remove the valve covers, timing belt, and camshaft sprocket. The subsequent steps pertain to the removal of each of the four camshafts, with a focus on securing the exhaust camshaft sub-gear first, followed by the removal of the intake cam and the exhaust camshaft. Ensure that the cam timing marks on the drive and driven gears align properly; this involves aligning the dots on the intake and exhaust camshaft gears on the right cylinder head and matching a single dot on the left cylinder head. Secure the exhaust camshaft sub-gear with a service bolt to eliminate torsional spring force, and subsequently, carefully disassemble the intake and exhaust camshafts by loosening and removing the bearing caps in a specific sequence. Store the bearing caps meticulously to maintain order, and if necessary, remove valve lifters and shims for separate storage. For the exhaust camshaft gear disassembly, mount the camshaft in a vise, use a service bolt, and remove the sub-gear snap-ring to access the wave washer, sub-gear, and camshaft gear spring. When reassembling the exhaust camshaft gear, insert service bolts, align holes, and secure the gears together. Apply moly-base grease or engine assembly lube to the lifters, then reinstall them in their original locations along with the valve adjustment shims. Lubricate the camshafts and set the exhaust camshaft into place with the timing mark on the sub-gear positioned correctly. Apply RTV sealant to the outer edges of the front bearing cap-to-cylinder head mating surfaces and tighten the bearing cap bolts incrementally. Replace the camshaft oil seal and apply camshaft installation lubricant to the intake camshaft lobes, bearing journals, and gear thrust faces. Reinstall the intake camshaft, ensuring the timing marks align with the exhaust camshaft timing mark. Insert bearing caps and tighten their bolts incrementally before proceeding with the removal of the service bolt from the exhaust camshaft sub-gear. Finally, reinstall the timing belt rear cover, camshaft sprockets, and timing belt, followed by the remaining components, ensuring proper sealing and gasket maintenance, then run the engine and inspect for leaks and functionality.Posted by ToyotaPartsDeal Specialist
- Q:How are the camshafts and camshaft bearing caps removed for the 2006 Toyota Solara? Posted by Customer
- A:First, verify the markings on the camshaft bearing caps. Then, loosen the caps in the reverse order of the tightening sequence, detach them, and remove the camshaft(s) from the cylinder head.Posted by ToyotaPartsDeal Specialist
- See expert answers on similar Camshaft
- Q:How to remove and install camshafts on V6 engine for 1997 through 2001 Toyota Solara and 1997 through 2001 Toyota Avalon? Posted by Customer
- A:Before proceeding, ensure you have two 6 x 1.0 mm bolts measuring 16 to 20 mm in length, referred to as service bolts hereafter. To initiate the removal process, align the engine at TDC and remove the valve covers, timing belt, and camshaft sprocket. The subsequent steps pertain to each of the four camshafts. Begin by securing the exhaust camshaft sub-gear, followed by the removal of the intake cam and then the exhaust camshaft for each head. Ensure alignment of cam timing marks on the drive and driven gears. For the right (rear) cylinder head, align the two dots on the intake camshaft gear with those on the exhaust camshaft gear. For the left (front) cylinder head, align the one dot on the intake camshaft gear with the one dot on the exhaust camshaft gear. Secure the exhaust camshaft sub-gear to the driven gear with a service bolt in the threaded hole. Gradually loosen intake camshaft bearing cap bolts in 1/4-turn increments until hand-removable, following the reverse of the recommended tightening sequence. Remove bearing caps and gently lift out the intake camshaft. Repeat the process for the exhaust camshaft. Ensure proper storage of bearing caps. Optionally, valve lifters and shims can be removed and stored separately. For exhaust camshaft gear disassembly, mount the camshaft in a vise with jaws gripping the large hex on the shaft. Insert a second service bolt in the unthreaded hole in the camshaft sub-gear, rotate the sub-gear clockwise using a screwdriver against the service bolt, and remove the first service bolt. Eliminate the second bolt if using a two-pin spanner. Remove the sub-gear snap-ring. Proceed to remove the wave washer, sub-gear, and camshaft gear spring from the camshaft, keeping rear and front cylinder head parts separated. For installation, reassemble exhaust camshaft gears by fitting the camshaft gear spring, sub-gear, wave washer, and snap-ring. Mount the camshaft in a padded vise, insert a service bolt into the unthreaded hole in the camshaft sub-gear, align the holes of the camshaft driven gear and sub-gear by turning the camshaft sub-gear clockwise, and install a second service bolt in the threaded hole, tightening to secure the gears. Remove the service bolt from the unthreaded hole. Apply moly-base grease or engine assembly lube to the lifters, install them in their original locations in the cylinder heads, ensuring valve adjustment shims are in place. Apply camshaft installation lubricant to exhaust camshaft lobes, bearing journals, and gear thrust faces. Set the exhaust camshaft in place in the cylinder head with the timing mark on the sub-gear facing the center of the head. On the right (rear) cylinder head, align the two dots on the intake camshaft gear with the two dots on the exhaust camshaft gear, and on the left (front) cylinder head, align the one dot on the intake camshaft gear with the one dot on the exhaust camshaft gear. Install bearing caps with arrows pointing toward the timing belt end of the engine and tighten bolts following the recommended sequence. Install a new camshaft oil seal. Repeat this process for the other cylinder head. Remove the service bolt from the exhaust camshaft sub-gear and reinstall camshaft sprockets and the timing belt. Reinstall the remaining components in reverse order, including applying RTV sealant before reinstalling valve covers and cleaning rubber half-circle plugs for the back of the heads, reinstalling them with new RTV sealant. Finally, run the engine, check for leaks and proper operation.Posted by ToyotaPartsDeal Specialist
- Q:What are the alignment requirements for cam timing marks for each cylinder head for the 2000 Toyota Avalon? Posted by Customer
- A:For the right (rear) cylinder head, align the two dots on the intake camshaft gear with those on the exhaust camshaft gear. For the left (front) cylinder head, align the one dot on the intake camshaft gear with the one dot on the exhaust camshaft gear.Posted by ToyotaPartsDeal Specialist
- See expert answers on similar Camshaft
- Q:What final steps are involved in reassembling the camshaft and related components, and why is proper alignment of timing marks crucial during this process for the 2000 Toyota Solara? Posted by Customer
- A:Final steps include reassembling the exhaust camshaft gear, aligning timing marks, securing bearing caps, and installing the timing belt and remaining components. Proper alignment of timing marks is crucial to maintain engine timing and performance.Posted by ToyotaPartsDeal Specialist
- See expert answers on similar Camshaft
- Q:How to remove and inspect a camshaft on V4 engine for 1997 through 2001 Toyota Solara and 1997 through 2001 Toyota Avalon? Posted by Customer
- A:Before initiating the removal process, ensure you have two 6 x 1.0 mm service bolts (16 to 20 mm long) at hand. To begin, remove the valve cover and the distributor. Proceed to remove the timing belt, camshaft sprocket, and upper rear belt cover. Measure the camshaft thrust clearance (endplay) using a dial indicator, and if it exceeds the service limit, replace the camshaft or cylinder head. For the exhaust camshaft, position the knock pin in the INTAKE camshaft at 10 to 45 degrees left of vertical, securing the exhaust camshaft sub-gear to the main gear with one service bolt before removing the rear exhaust camshaft bearing cap bolts and caps. Loosen and remove the exhaust camshaft bearing cap bolts sequentially and then remove the camshaft. For the intake camshaft, place the knock pin at 80 to 115 degrees left of vertical, remove the front intake camshaft bearing cap bolts, and lift off the caps and oil seal. Loosen and remove the intake camshaft bearing cap bolts sequentially and then remove the camshaft. To disassemble the exhaust camshaft gear, mount it in a vise and install a second service bolt in the unthreaded hole to secure the sub-gear. Rotate the sub-gear clockwise and remove the first service bolt, followed by the snap-ring, wave washer, sub-gear, and camshaft gear spring. Inspection involves measuring the camshaft gear spring's end gap, checking valve lifters and shims, inspecting each lifter for wear, measuring lifter bore oil clearance, examining cam lobes and journals for damage, and checking journal oil clearance. To measure journal oil clearance, clean the bearing caps and journals, lay Plastigage on each journal, install the caps, tighten the bolts in increments, and compare the crushed Plastigage width to specifications. If clearance exceeds the limit, replace the camshaft or cylinder head. For reinstallation, apply moly-base grease or assembly lube to lifters, camshaft lobes, and journals. Follow specific positioning instructions for the intake and exhaust camshafts, apply RTV sealant as needed, secure bearing caps, and install a new camshaft oil seal for the intake camshaft. Reassemble the exhaust camshaft gear, align the camshaft gears' timing marks, install the bearing caps, tighten bolts in increments, and remove the service bolt from the camshaft gear. Complete the process by installing the timing belt pulley, timing belt, and the remaining components in reverse order.Posted by ToyotaPartsDeal Specialist
If you have any questions about this product, please don't hesitate to ask us. We will be happy to help you!
Genuine Toyota Part 13053-20010, the Right Choice
Why choose Toyota Parts Deal
- Dedicated Service
Your complete satisfaction is our #1 goal
- Lowest Prices
Best deals on genuine OE parts from dealerships
- Fast Delivery
Orders are processed and delivered promptly