Toyota Celica Parts
- Select Vehicle by VIN
- Select Vehicle by Model
For the most accurate results, search by your VIN (Vehicle Identification Number).

Why choose ToyotaPartsDeal
- High-Grade Parts
The best site to buy Toyota Celica genuine parts for years has been ToyotaPartsDeal.com. We're the best online store for genuine parts. Toyota Celica parts you could ever need are available here at the finest quality and best value on the web that will have your vehicle performing past its limits.
- Value For Money
What makes us the best choice for OEM Toyota Celica parts? You get tremendous savings because our goal is to offer unbeatable prices. At ToyotaPartsDeal.com, Our products offer the same performance and reliability as their OEM counterparts without having to break your wallet.
- Quick Delivery
Everything you need for routine maintenance and repair can be found in our complete Toyota Celica parts catalog. Having the best OEM parts inventory available, the parts for your vehicle will arrive fast no matter your location in the nation. You'll be back on the open road before you know it.
Popular Genuine Toyota Celica Parts
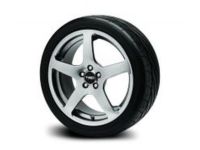
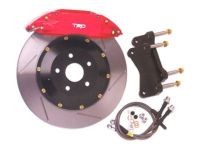
- Power Train/Chassis Parts View More >
- Body Parts View More >
- Engine/Fuel/Tool Parts View More >
- Electrical Parts View More >


Genuine Toyota Celica Accessories

Shop Genuine Toyota Celica Parts with ToyotaPartsDeal.com
The Toyota Celica is a sporty car produced by Toyota from 1970 to 2006, spanning seven generations and featuring various four-cylinder engines. In the North American market, the first three generations were powered by different variants of Toyota's R engine. In August 1985, the Celica transitioned from rear-wheel drive to front-wheel drive, and between 1986 and 1999, turbocharged and AWD models were offered. Starting in December 1997, the phase-regulation system was introduced on some Japanese Toyota Celica models and became standard from 2000 onwards. In 1986, the six-cylinder Toyota Celica Supra became a standalone model and was renamed Supra. The Celica was initially available in non-styled, fixed-roof, sunroof, and bottle versions, with the SV-1 Liftback prototype presented as a concept car at the 1971 Tokyo Motor Show. Over the years, the Celica underwent various modifications in features, engines, and transmissions to suit different markets. The Celica's sporty design, a diverse range of configurations, and powerful performance have made it an iconic Toyota model.
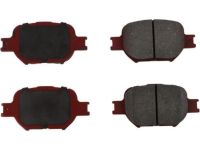
Despite its superior design as a sports car, the Toyota Celica isn't immune to common automotive problems over time. The primary issue is engine failure, characterized by misfires, rough idling, stalling, reduced power, and poor fuel economy. Often, the Check Engine Light might illuminate when the car is in a no-start condition. A thorough inspection of the ignition coil, body control module, engine control module, oxygen sensor, and spark plug can help identify the failing part. The Celica also experiences suspension and transmission issues. Suspension problems, often due to faulty coil spring insulators, can cause the car to bottom out or make excessive grinding noises while turning. Transmission issues typically manifest as inaccurate gear shifts or difficulty in changing gears, likely due to a faulty shift cable, broken synchronizer ring, or damaged transfer case seal. In addition to these, maintaining essential parts like the seat belt, which provides safety in accidents, the door handle, for convenient access, and the wiper blade, for clear visibility, is crucial for keeping the Celica in prime condition.
If you want to save money in the long run on maintenance and repairs, you should choose OEM products because they're of the highest level of durability. When the need for Toyota Celica parts arises, make our website your first port of call. We carry an expansive selection of genuine Toyota Celica parts, all offered at the most competitive prices. We uphold stringent quality standards, hence every OEM part is backed by a manufacturer's warranty. Moreover, we operate with a steadfast commitment to ensuring 100% customer satisfaction.
Toyota Celica Parts Questions & Answers
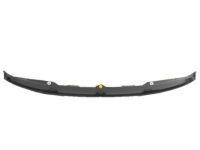
- Q: How to remove and install a radiator grille?A: If necessary, remove the radiator shroud cover. Disengage the grille retaining clips with a pair of needle-nose pliers. On some models, the center of the grille may be retained by two screws instead of clips. Once all of the retaining clips are disengaged, pull the grille out and remove it. To install it, press it until it clips into position.
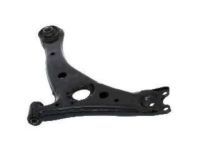
- Q: How do you remove the control arm?A: To remove the control arm, start by loosening the wheel lug nuts on the side to be dismantled and raising the front of the vehicle. Support it securely on jack stands and remove the wheel. Then, remove the bolt and two nuts holding the control arm to the steering knuckle. If you're removing the left side control arm on a vehicle equipped with an automatic transmission, also remove the suspension cross member. Next, remove the nut from the stabilizer bar link and disconnect the link from the control arm. For inspection, check the control arm for distortion and the bushings for wear, replacing parts as necessary. Do not attempt to straighten a bent control arm. To install the control arm, start by installing the new washer at the rear bracket with the beveled side towards the front of the vehicle. Then, install the new washer on the control arm shaft with the beveled side towards the rear of the vehicle. The remainder of the installation is the reverse of removal. Tighten all of the fasteners. Finally, install the wheel and lug nuts, lower the vehicle, and tighten the lug nuts.
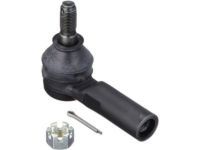
- Q: How do you remove the tie-rod end?A: To remove the tie-rod, start by loosening the wheel lug nuts and raising the front of the vehicle. Support it securely on jack stands, block the rear wheels, and set the parking brake. Remove the front wheel. Hold the tie-rod with a pair of locking pliers or a wrench and loosen the jam nut enough to mark the position of the tie-rod end in relation to the threads. Remove the cotter pin and loosen the nut on the tie-rod end stud. Use a puller to disconnect the tie-rod from the steering knuckle arm. Remove the nut and separate the tie-rod. To install the tie-rod, thread the Tie Rod End onto the marked position and insert the tie-rod stud into the steering knuckle arm. Tighten the jam nut securely. Install the castellated nut on the stud and tighten it. Install a new cotter pin. Finally, install the wheel and lug nuts, lower the vehicle, and tighten the lug nuts. It is recommended to have the alignment checked by a dealer service department or an alignment shop.
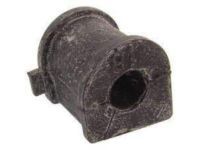
- Q: How do you remove and replace the rear Sway Bar Kit and Sway Bar Bushing on a Toyota Celica?A: Remove the Sway Bar Kit on a vehicle by raising the vehicle and supporting it securely on jackstands. Then, remove the link-to-Sway Bar Kit nuts and unbolt the brackets from the body. Next, support the fuel tank with a floor jack and block of wood, and remove the fuel tank band bolts to lower the fuel tank slightly. With the fuel tank lowered, the Sway Bar Kit can be removed by pulling off the U-brackets using a rocking motion. Before installation, check the bushings for any signs of wear or damage and replace them if necessary. Additionally, clean the areas of the bar where the Sway Bar Bushing ride using a wire brush. Finally, installation is the reverse of the removal procedure, and if needed, a light coat of vegetable oil can be used to ease bushing and U-bracket installation, avoiding petroleum-based products or brake fluid which can damage the rubber.