Your vehicle deserves only genuine OEM Toyota parts and accessories. To ensure reliability, purchase Toyota part # 13408-74041 PULLEY, Crankshaft. It is sometimes referred to as Toyota Crankshaft Pulley, Toyota Harmonic Balancer. Our Toyota parts and accessories are expedited directly from authorized Toyota dealers strategically located all across the U.S. and are backed by the manufacturer's 12 month, 12,000 mile warranty. OEM Toyota parts are the best for restoring your vehicle to factory condition performance. This part fits 1992-2001 Toyota Camry, 1994-1999 Toyota Celica, 1996-2000 Toyota RAV4, 1999-2002 Toyota Solara.
Affordable, reliable and built to last, Toyota part # 1340874041 PULLEY, Crankshaft stands out as the smart option. ToyotaPartsDeal.com is your prime online source with the biggest and best selection of genuine Toyota parts and accessories at giant discounted prices. We have the OEM Toyota parts and accessories you need at the wholesale prices. ToyotaPartsDeal.com has you covered no matter what type of Toyota vehicle you drive. For detailed Toyota parts information, click here.
Make sure this part fits your vehicle
Toyota 13408-74041 PULLEY, Crankshaft
1992-2002 Toyota 1340874041
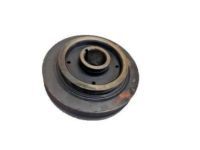


- Part DescriptionPULLEY, Crankshaft
- Part Name Code13471
- Replaced By13408-74031
- ManufacturerToyota
$305.42 MSRP: $437.95 1
You Save: $132.53 (31%)
Ships in 1-3 Business Days
 Bearing, BALANCESHAFT11911-28010-01
 Bearing, Connecting Rod13041-03020-02
 Bearing, Crankshaft11071-03030-03
 Bearing, Crankshaft11721-0H010-01
 Pin, Piston13251-0H010-A0
 Piston13211-0H010-A0
 Ring Set, Piston13011-0A020
 Ring, Hole Snap90520-22025
 Rod Sub-Assy, Connecting13201-09070
 Washer, Crankshaft Thrust, Upper11791-0H010
Product Specifications
Brand Genuine Toyota Part Name Code 13471 Manufacturer Part Number 13408-74041 Part Description PULLEY, Crankshaft Manufacturer Note (J) Item Dimensions 7.9 x 3.4 x 7.9 inches Item Weight 5.20 Pounds Condition New Fitment Type Direct Replacement Manufacturer Toyota SKU 13408-74041 Warranty This genuine Toyota part is guaranteed by Toyota's factory warranty. Shipping & Return Shipping Policy Return Policy Warning: California’s Proposition 65Vehicle Fitment
Year Make Model Trim & Engine Important vehicle option details 1992-2001 Toyota Camry CE, DX, LE, XLE|4 Cyl 2.2L 5SFE; 5SFE; SXV10L-AEMDKA, SXV10L-AEMDKK, SXV10L-AEMNKK, SXV10L-AEPDKA, SXV10L-AEPDKK, SXV10L-AEPGKA, SXV10L-AEPNKA, SXV10L-AEPNKK, SXV10L-CCMDKA, SXV10L-CCMDKK, SXV10L-CCMNKK, SXV10L-CCPDKA, SXV10L-CCPDKK, SXV10L-CCPNKA, SXV10L-CCPNKK, SXV10L-CEMDKA, SXV10L-CEMDKK, SXV10L-CEMNKK, SXV10L-CEPDKA, SXV10L-CEPDKK, SXV10L-CEPGKA, SXV10L-CEPNKA, SXV10L-CEPNKK, SXV10L-CWMDKK, SXV10L-CWPDKA, SXV10L-CWPDKK, SXV10L-CWPNKA, SXV10L-CWPNKK, SXV20L-AEPDKK, SXV20L-AEPGKA, SXV20L-AEPNKA, SXV20L-AEPNKK, SXV20L-CEMDKA, SXV20L-CEMDKK, SXV20L-CEMNKK, SXV20L-CEPDKA, SXV20L-CEPDKK, SXV20L-CEPGKA, SXV20L-CEPNKA, SXV20L-CEPNKK 1994-1999 Toyota Celica GT, ST|4 Cyl 2.2L 5SFE; 5SFE; ST204L-BCMGKA, ST204L-BCMGKK, ST204L-BCMSKA, ST204L-BCPGKA, ST204L-BCPGKK, ST204L-BCPSKA, ST204L-BKMGKA, ST204L-BKPGKA, ST204L-BLMGKA, ST204L-BLMGKK, ST204L-BLMSKA, ST204L-BLPGKA, ST204L-BLPGKK, ST204L-BLPSKA 1996-2000 Toyota RAV4 4 Cyl 2.0L 3SFE; 3SFE; SXA10L-AKMGKA, SXA10L-AKPGKA, SXA10L-AZMGKA, SXA11L-AWMGKA, SXA11L-AWPGKA, SXA15L-AKMGKA, SXA15L-AKPGKA, SXA15L-AZMGKA, SXA15L-AZPGKA, SXA16L-AWMGKA, SXA16L-AWPGKA 1999-2002 Toyota Solara 4 Cyl 2.2L 5SFE; 5SFE; SXV20L-GCMNKA, SXV20L-GCPNKA, SXV20L-GCPNKK, SXV20L-GKPNKA
Customer Questions & Answers
- Q:Does it fit my car? Posted by ToyotaPartsDeal Specialist
- A:You can Select Your Vehicle to check if 13408-74041 fits your vehicle.Posted by ToyotaPartsDeal Specialist
- Q:How to install Harmonic Balancer? Posted by Customer
- A:After installing, torquing, and checking the crankshaft and pistons/rods, clean the surface of the block and the Harmonic Balancer spacers. Then, place the spacers on the block. Turn the crankshaft until the number 1 piston is at TDC. Align the punch marks on the balance shafts with their corresponding marks on the housing. Place the Harmonic Balancer on the block and install the bolts. Apply hand pressure on the center of the assembly in the indicated direction and tighten the bolts in several steps, following the sequence shown. Position a dial indicator against the end of the number 1 balance shaft and check the shaft endplay while pushing the shaft back and forth by hand. Repeat the check for the number 2 balance shaft and compare your readings to the specifications. If the endplay is excessive, remove the Harmonic Balancer and take it to a dealer service department or other qualified service facility for repair. Check the balancer shaft gear-to-crankshaft gear backlash at the four indicated locations. Rotate the crankshaft several revolutions and return to TDC for the number 1 piston. Check that the punch marks are still aligned. Rotate the engine clockwise until punch mark A lines up with the notch in the balancer housing. Position a lever-type dial indicator on the side of a tooth of the number 1 shaft gear. Lightly twist the number 1 shaft back and forth a few times by hand and, while pressing on the rear of the shaft to take up the endplay, lightly twist the shaft while observing the dial indicator. Compare the results to on-engine balancer backlash. Remove the dial indicator and rotate the engine clockwise until punch mark B on balance shaft 1 lines up with the notch in the housing. Measure backlash at this position and compare the results to on-engine balancer backlash. Repeat the previous steps and compare the results to on-engine balancer backlash. If any of the readings exceed specifications, change the spacer between the block and the balance assembly to obtain proper backlash. To increase backlash, select a thick spacer; select a thinner spacer to reduce backlash. Changing the spacer by 0.0008-inch changes the backlash by 0.0006-inch. Note: Various size spacers are available at your Toyota Dealership.Posted by ToyotaPartsDeal Specialist
- Q:How to measure backlash in the engine balancer assembly? Posted by Customer
- A:The harmonic balancer assembly consists of two shafts contained in an upper and lower aluminum housing assembly. The shafts are geared together, and one of the shafts is geared to the crankshaft. The following procedure applies only when the harmonic balancer assembly is removed from the engine. Do NOT disassemble the harmonic balancer assembly! Start with the punch marks on the number 2 shaft lined up as indicated. The balancer shafts have punch marks and the number 2 housing has alignment notches - start with the shafts aligned, then align the number 2 shaft so that mark D is aligned with the housing. Using locking pliers to hold the number 2 shaft from turning, measure the backlash on the number 1 gear with a dial indicator. Set up the dial Indicator as shown and measure the backlash while applying mild hand pressure on the rear of both shafts, while keeping forward pressure on the rear of both shafts to eliminate thrust play. Compare the backlash to the specifications. Remove the dial indicator and turn the number 2 shaft so that punch mark E now aligns with the case. Measure backlash again compare the results with the specifications. Remove the dial indicator again and turn the number 2 shaft so that punch mark F now aligns with the case. Measure backlash again compare the results with the specifications. If any of the three measurements exceed the specifications, it is suggested that the harmonic balancer assembly be taken to a Toyota dealer or other qualified service facility for further disassembly and repair.Posted by ToyotaPartsDeal Specialist
- Q:How to remove and install a crankshaft pulley on V4 engine for Toyota Solara and 2002 through 2006 Toyota Avalon? Posted by Customer
- A:Detach the cable from the negative terminal of the battery. Remove the drive belt. Unbolt the bracket from the engine movement control rod. With the parking brake applied and the shifter in Park (automatic) or in gear (manual), loosen the lug nuts from the right front wheel, then raise the front of the vehicle and support it securely on jackstands. Remove the right front wheel and the right splash shield from the wheel well. Remove the bolt from the front of the crankshaft. A breaker bar will probably be necessary since the bolt is very tight. Using a puller that bolts to the crankshaft hub, remove the crankshaft pulley from the crankshaft. Note: Depending on the type of puller you have, it may be necessary to support the engine from above; remove the right side engine mount and lower the engine to gain sufficient clearance to use the puller. To install the crankshaft pulley, slide the pulley onto the crankshaft as far as it will slide on, then use a vibration damper installation tool to press the pulley onto the crankshaft. Note that the slot (keyway) in the hub must be aligned with the Woodruff key in the end of the crankshaft and that the crankshaft bolt can also be used to press the crankshaft pulley into position. Tighten the crankshaft bolt. The remaining installation steps are the reverse of removal.Posted by ToyotaPartsDeal Specialist
- Q:What components need to be removed before loosening the balancer mounting bolts for the 2000 Toyota Solara? Posted by Customer
- A:The oil pan, pick-up tube, and oil pump need to be removed before loosening the balancer mounting bolts.Posted by ToyotaPartsDeal Specialist
- See expert answers on similar Harmonic Balancer
If you have any questions about this product, please don't hesitate to ask us. We will be happy to help you!
Genuine Toyota Part 13408-74041, the Right Choice
Why choose Toyota Parts Deal
- Dedicated Service
Your complete satisfaction is our #1 goal
- Lowest Prices
Best deals on genuine OE parts from dealerships
- Fast Delivery
Orders are processed and delivered promptly