My Garage
Cart
Make sure this part fits

Scion 11101-39776 Head Sub-Assembly, Cylinder

2011-2016 Scion tC 1110139776

Customer Questions & Expert Answers (6)
Toyota 11101-39776 Head Sub-Assembly, Cylinder
  • Part Description
    Head Sub-Assy, Cylinder
  • Part Name Code
    11101
  • Replaces
    11101-39715, 11101-09346, 11101-09345
  • Manufacturer
    Toyota
Make sure this part fits
$880.82 MSRP: $1102.66
You Save: $221.84 (21%)
Ships in 1-3 Business Days
1
ADD TO CART
  • Related Parts
  • Product Specifications
  • Vehicle Fitment
  • Customer Questions & Expert Answers
  • Product Specifications

    BrandGenuine Scion
    Part Name Code11101
    Manufacturer Part Number11101-39776
    Part DescriptionHead Sub-Assy, Cylinder
    Other NamesCylinder Head
    Item Dimensions21.5 x 12.8 x 10.5 inches
    Item Weight27.10 Pounds
    ConditionNew
    Fitment TypeDirect Replacement
    Replaces11101-39715, 11101-09346, 11101-09345
    ManufacturerToyota
    SKU11101-39776
    WarrantyThis genuine Toyota part is guaranteed by Toyota's factory warranty.
    Shipping & ReturnShipping Policy Return Policy
    Warning: California's Proposition 65
  • Vehicle Fitment

    Year Make Model Trim & Engine Important vehicle option details
    2011-2016 Scion tC4 Cyl 2.5L2ARFE; AGT20L-ALFGKA, AGT20L-ALFGKK, AGT20L-ALTGKA, AGT20L-ALTGKK
  • Customer Questions & Expert Answers

    Q:
    Does it fit my car? Posted by ToyotaPartsDeal Specialist
    A:
    You can Select Your Vehicle to check if 11101-39776 fits your vehicle.
    Posted by ToyotaPartsDeal Specialist
    Q:
    How to remove and install the Cylinder Head in 3.5L V6 engine on Toyota Highlander? Posted by Customer
    A:
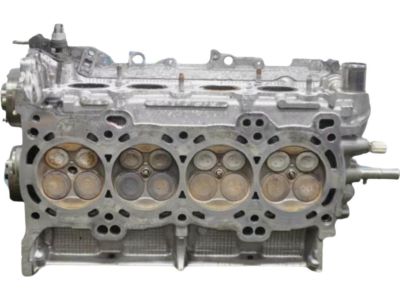
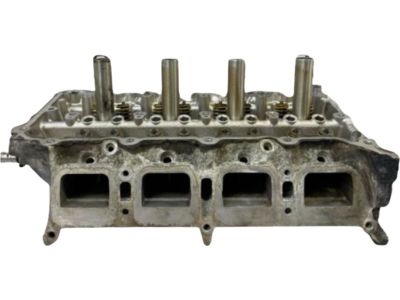
    New cylinder head bolts should be used when installing the cylinder head. This procedure applies to either cylinder head, and the manufacturer recommends removing the engine and transaxle assembly to perform it. Begin by removing the camshafts and camshaft housings, followed by the exhaust manifolds. If removing the left cylinder head, gradually loosen and remove the two front bolts. Remove the cylinder head bolts gradually and evenly, in the order opposite that of the tightening sequence, then take off the cylinder head from the engine block. Discard the old cylinder head gasket. Ensure the mating surfaces of the cylinder heads and block are perfectly clean before installation. Use a gasket scraper to eliminate all traces of carbon and old gasket material, then clean the surfaces with brake system cleaner. Stuff the cylinders with clean shop rags to keep out debris while working on the block, and use a vacuum cleaner to remove any material that falls into the cylinders. Check the block and head mating surfaces for nicks, deep scratches, and other damage; slight damage can be removed with a file, while excessive damage may require machining. Use a tap of the correct size to chase the threads in the cylinder head bolt holes, then clean them with compressed air to ensure nothing remains in the holes. Position the cylinder head gasket on the engine block with the lot number stamp facing up, then carefully place the cylinder head on the gasket. Apply a light coat of oil to the new cylinder head bolts, install and tighten them gradually and evenly, in the proper sequence, to the initial torque. After tightening all eight bolts to the initial torque, mark the front edge of each bolt, then retighten each bolt in the same sequence another 90 degrees, repeating this process one more time for a total of 180 degrees from the initial torque. If installing the left cylinder head, install the two front head bolts and tighten them in the correct sequence to the torque. If both cylinder heads were removed, install the other cylinder head now. Proceed to install the intake and exhaust camshafts, followed by the camshaft timing oil control valve, oil control valve filter, and VVT-i sensor. Install the timing chains, timing chain cover, and all components attached to the cover. The remainder of the installation is the reverse of removal. Finally, install the engine/transaxle assembly, refill the engine with oil and coolant, reconnect the cable to the negative battery terminal, start the engine, and check for leaks.
    Posted by ToyotaPartsDeal Specialist
    Q:
    How to remove and install the cylinder head in Four cylinder engine on Toyota Highlander? Posted by Customer
    A:
    To remove the cylinder head, first relieve the fuel system pressure and disconnect the cable from the negative terminal of the battery, then drain the engine coolant. Next, remove the drivebelt and alternator, followed by the valve cover, throttle body, fuel injectors, fuel rail, intake manifold, and exhaust manifold. Remove the timing chain and camshaft sprockets, ensuring the engine is supported from below with a floor jack and a block of wood after the pressed steel portion of the oil pan is removed. For 2008 and later models, remove the camshafts, lifters, and camshaft housing. Label and disconnect the coolant hoses and electrical connections from the cylinder head, loosening the cylinder head bolts in 1/4-turn increments until they can be removed by hand, following the reverse order of the tightening sequence. Lift the cylinder head off the engine block, prying carefully if it is stuck, and remove any remaining external components for thorough cleaning and inspection. For installation, ensure the mating surfaces of the cylinder head and block are perfectly clean, using a gasket scraper and brake system cleaner to remove all traces of carbon and old gasket material. Stuff the cylinders with clean shop rags to keep out debris and use a vacuum cleaner to remove any material that falls into the cylinders. Check the mating surfaces for damage, chasing the threads in the cylinder head bolt holes with a tap and cleaning them with compressed air. Install the components that were removed, position the new gasket over the dowel pins in the block, and apply RTV sealant to the ends of the cylinder head gasket. Carefully set the cylinder head on the block without disturbing the gasket, apply clean engine oil to the threads and under the bolt heads of the new cylinder head bolts, and tighten them finger tight before following the recommended sequence for final tightening. The remainder of the installation follows the reverse order of removal, with a caution to wait at least four hours before adding oil and coolant and starting the engine. For 1999 through 2007 models, check and adjust the valves as necessary, change the engine oil and filter, refill the transfer case for 4WD models, and refill the cooling system, running the engine to check for leaks.
    Posted by ToyotaPartsDeal Specialist
    Q:
    How to remove and install Cylinder Head on Toyota Rav4? Posted by Customer
    A:
    Before removing the engine, set the fuel pump pressure to zero then disconnect the terminal on the battery's negative side. Dispose of the coolant, and unbolt the engine to take it out of the car. Next, one removes the drivebelt and alternator, then the valve cover as well out of the car. The final steps involve the removal of throttle body, fuel injectors and fuel rail, furthermore, the intake and exhaust manifolds should be disconnected. Continue with the dismantle of the timing chain and the camshaft sprockets and then the camshafts, the lifters and a camshaft housing. Remove the coolant hoses and electrical connections from the cylinder head and label for identification. A 10 mm hex-head socket bit with a breaker bar is needed to loosen it in an anti-clockwise way in a turn by turn procedure which should be simple to remove by hand, however, it is required to remove it in a reverse of the tightening sequence given so it is not warped or cracked. Raise the cylinder head off the engine block using a giddier, if necessary, and take out any further exterior fixtures for deep washing as well as checking. When installing the mating surfaces of the cylinder head and block have to be free of any carbon or any remains of the previous gasket and for that gasket scraper and brake system cleaner have to be used. The cylinders have to be plugged with clean shop rags to ensure that no foreign material gets inside the cylinders, in case of accumulation of material in the cylinders it can be vacuum cleaned. The mating surfaces of the block and cylinder head should be inspected, and this can be done, and corrected with a file if they are slightly raised, or brought to a machinist for further work if severely raised. Tap a thread of the correct size in the cylinder head bolt holes and using the compressed air, clean the holes with appropriate protection of the eye. Put back the components taken from the cylinder head, align the new gasket with the dowel pin hole in the block and spread the RTV sealant to the ends of the cylinder head gasket. Place the cylinder head back on the block without shifting the gasket as you tighten the head bolts in a star pattern until they are tightened hand-tight with clean engine oil put on the threads of the bolts and under the bolt heads new cylinder head . Perform the subsequent steps in the given order to apply the force and tighten the bolts to the prescribed torque. The rest of the installation process is the exact opposite of the removal process. This should be followed by at least one day before oil and coolant replenishment and starter motoring as well as looking for leaks and, finally, changing the engine oil and filter, refilling the cooling system, running the engine, and checking for leaks.
    Posted by ToyotaPartsDeal Specialist
    Q:
    How is the cylinder head removed for the 2015 Toyota Camry? Posted by Customer
    A:
    To remove the cylinder head:Loosen the cylinder head bolts in 1/4-turn increments using a 10 mm hex-head socket bit and a breaker bar.Lift the cylinder head off the engine block.Remove any remaining external components for cleaning and inspection.
    Posted by ToyotaPartsDeal Specialist
    See expert answers on similar Cylinder Head
    Q:
    What is the initial recommendation regarding engine and transaxle assembly, and why is this procedure important for the 2015 Toyota Camry? Posted by Customer
    A:
    The manufacturer recommends removing the engine and transaxle assembly for this procedure. This procedure is essential for tasks related to either cylinder head.
    Posted by ToyotaPartsDeal Specialist
    See expert answers on similar Cylinder Head
    If you have any questions about this product, please don't hesitate to ask us. We will be happy to help you!

Genuine Toyota Part 11101-39776, the Right Choice

To ensure reliability, purchase Toyota part # 11101-39776 Head Sub-Assembly, Cylinder. It is sometimes referred to as Scion Cylinder Head. For unrivaled quality, OEM parts are the ultimate choice. These parts are manufactured by Toyota's official factory using top-quality materials and undergo strict testing procedures, ensuring outstanding dependability and long-lasting durability. This part fits 2011-2016 Scion tC.

ToyotaPartsDeal.com is a leading supplier of genuine Toyota parts and accessories such as Toyota 1110139776 Head Sub-Assembly, Cylinder. In need of OEM Toyota parts? Look no further than our extensive inventory of genuine Toyota parts, competitively priced to be highly exceptional in the market. They are all manufacturer-warrantied. Add to that, our easy return policy and swift delivery service, and your shopping experience promises to be the great pleasant ever. For detailed Scion parts information, click here.

Why choose Toyota Parts Deal

  • Dedicated Service

    Your complete satisfaction is our #1 goal

  • Lowest Prices

    Best deals on genuine OE parts from dealerships

  • Fast Delivery

    Orders are processed and delivered promptly