This part fits the vehicle you selected:
My Vehicle: 5TFUW5F11CX232874 2012 Toyota Tundra 8 Cyl 5.7L DOHC EFI; SR5; 6-Speed Automatic Transmission; Double Cab; High Efficiency Twin Cam (Flex Fuel); S Type; USK56L-CRTSGA
Change VehicleThe location this part fits:
- Passenger Side
- Production Date: 04/2009-08/2013
- Fitting Vehicle Options: UPK51, 56.. S; GSK5#, UPK50, USK51, 52, 55, 56, 57
Toyota 48068-09100 Front Suspension Control Arm Sub-Assembly Lower Right
2007-2022 Toyota 4806809100
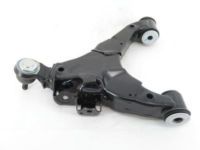


- Part DescriptionArm Sub-Assy, Front Suspension, Lower No.1 Rh
- Part Name Code48068
- PositionPassenger Side
- ManufacturerToyota
This part fits the vehicle you selected:
5TFUW5F11CX232874 2012 Toyota Tundra 8 Cyl 5.7L DOHC EFI; SR5; 6-Speed Automatic Transmission; Double Cab; High Efficiency Twin Cam (Flex Fuel); S Type; USK56L-CRTSGA
The location this part fits:
- Passenger Side
- Production Date: 04/2009-08/2013
- Fitting Vehicle Options: UPK51, 56.. S; GSK5#, UPK50, USK51, 52, 55, 56, 57
$307.21 MSRP: $440.52 1
You Save: $133.31 (31%)
Product Specifications
| Brand | Genuine Toyota |
| Part Name Code | 48068 |
| Manufacturer Part Number | 48068-09100 |
| Part Description | Arm Sub-Assy, Front Suspension, Lower No.1 Rh |
| Other Names | Lower Control Arm |
| Item Dimensions | 23.5 x 23.3 x 12.6 inches |
| Item Weight | 31.20 Pounds |
| Position | Passenger Side |
| Condition | New |
| Fitment Type | Direct Replacement |
| Manufacturer | Toyota |
| SKU | 48068-09100 |
| Warranty | This genuine Toyota part is guaranteed by Toyota's factory warranty. |
| Shipping & Return | Shipping Policy Return Policy |
Warning: California’s Proposition 65
Customer Questions & Answers
- Q:Is the above part number correct or is there another correct number for my car? Posted by ToyotaPartsDeal Specialist
- A:You can Select Your Vehicle to check if 48068-09100 fits your vehicle.Posted by ToyotaPartsDeal Specialist
- Q:How to remove and install a lower control arm on a Toyota Sequoia and Toyota Tundra? Posted by Customer
- A:Loosen the wheel lug nuts, raise the front of the vehicle and support it securely on jackstands. Apply the parking brake. Remove the wheel. Remove the under-vehicle splash shield. Unbolt the steering gear assembly from the frame. Unbolt the shock absorber/coil spring assembly from the lower control arm. Remove the bolts and detach the stabilizer bar links from the lower control arms. Remove the cotter pin, then loosen the lower balljoint nut a few turns. Using a two-jaw puller or a picklefork-type balljoint separator, separate the balljoint from the lower control arm. Make alignment marks on the front and rear adjusting cams. Hold the adjusting cam plate nuts with a wrench and unscrew the pivot bolts. Remove the bolts and detach the control arm from the frame. Inspect the bushings for wear and deterioration. If they're cracked or damaged, take the arm to an automotive machine shop and have new bushings installed. Installation is the reverse of removal. Make sure that the alignment marks you made prior to disassembly are lined up. Tighten all suspension fasteners, and use a new cotter pin on the lower control arm balljoint nut. If necessary, tighten the balljoint nut a little more to align the hole in the ballstud with the slots in the nut - don't loosen the nut to achieve this alignment. The pivot bolts should be tightened with the vehicle at normal ride height. This can be done after the vehicle has been lowered to the ground (on vehicles with adequate clearance), or can be simulated by raising the lower control arm with a floor jack. Tighten the lug nuts. Have the wheel alignment checked and, if necessary, adjusted.Posted by ToyotaPartsDeal Specialist
- Q:How to remove and install an upper control arm on a Toyota Sequoia and Toyota Tundra? Posted by Customer
- A:Loosen the wheel lug nuts, raise the front of the vehicle and support it securely on jackstands. Apply the parking brake. Remove the wheel. If equipped with ABS, disconnect the speed sensor wiring harness from the upper control arm and steering knuckle. Remove the inner fender apron seal. Remove the cotter pin, then loosen the upper balljoint nut a few turns. Using a two-jaw puller or a picklefork-type balljoint separator, separate the balljoint from the upper control arm. Caution: Don't allow the steering knuckle to fall outward, as the brake hose may be damaged. It's a good idea to wire the steering knuckle to the coil spring so this doesn't happen. Remove the nut, washer and pivot bolt and detach the upper control arm from the frame. Remove the arm. Inspect the bushings for wear and deterioration. If they're cracked or damaged, take the arm to an automotive machine shop and have new bushings installed. Installation is the reverse of removal. Tighten all suspension fasteners, and use a new cotter pin on the upper control arm balljoint nut. If necessary, tighten the balljoint nut a little more to align the hole in the ballstud with the slots in the nut - don't loosen the nut to achieve this alignment. Note: The pivot bolt/nut should be tightened with the vehicle at normal ride height. This can be done after the vehicle has been lowered to the ground (on vehicles with adequate clearance), or can be simulated by raising the lower control arm with a floor jack. Tighten the lug nuts. It's a good idea to have the wheel alignment checked and, if necessary, adjusted.Posted by ToyotaPartsDeal Specialist
If you have any questions about this product, please don't hesitate to ask us. We will be happy to help you!
Why choose Toyota Parts Deal
- Dedicated Service
Your complete satisfaction is our #1 goal
- Lowest Prices
Best deals on genuine OE parts from dealerships
- Fast Delivery
Orders are processed and delivered promptly