My Garage
My Account
Cart
This part fits
2007 Toyota Prius United States Of America; NHW20L-AHEEBA
Check another vehicle- Production Date: 11/2005-03/2009
- Fitting Vehicle Options: NHW20
Toyota 82620-47050 Fusible Link Block Assembly
2004-2009 Toyota Prius 8262047050
Customer Questions & Expert Answers (2)
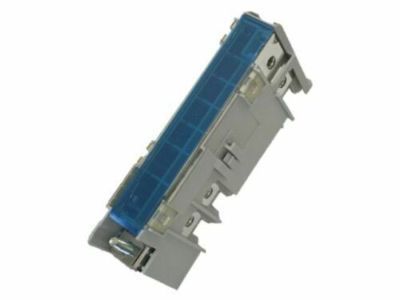
- Part DescriptionBlock Assy, Fusible Link
- Part Name Code82620B
- ManufacturerToyota
This part fits
2007 Toyota Prius United States Of America; NHW20L-AHEEBA
Check another vehicle- Production Date: 11/2005-03/2009
- Fitting Vehicle Options: NHW20
$95.45 MSRP: $134.55
You Save: $39.10 (30%)
Ships in 1-3 Business Days
1
- Related Parts
- Specifications
- Q&A
Product Specifications
Brand Genuine Toyota Part Name Code 82620B Manufacturer Part Number 82620-47050 Part Description Block Assy, Fusible Link Other Names Fuse Box Item Weight 0.90 Pounds Condition New Fitment Type Direct Replacement Manufacturer Toyota SKU 82620-47050 Warranty This genuine Toyota part is covered by warranty. Shipping & Return Shipping Policy Return Policy Warning: California's Proposition 65Customer Questions & Expert Answers
- Q:I just want to confirm I'm purchasing a correct part before placing an order Posted by ToyotaPartsDeal Specialist
- A:You can Select Your Vehicle to check if 82620-47050 fits your vehicle.Posted by ToyotaPartsDeal Specialist
- Installation and Repair Tips by AI Expert
- Removal steps 1. Safety first: park on level ground, place transmission in Park, shut off ignition, remove key/fob, and apply parking brake. 2. High-voltage warning: this vehicle may contain high-voltage components-if you are not qualified to work on hybrids, have a trained technician remove the high-voltage service disconnect and de-energize the system. 3. Disconnect the 12-volt battery (negative first) to isolate low-voltage circuits before touching the fuse box. 4. Remove any trim, panels, or protective covers that block access to the fuse box; access methods vary by design. 5. Photograph and label fuse positions and electrical connectors so you can restore them exactly as found. 6. Remove or pull any fuses or fusible links that will impede removal, keeping them organized and protected. 7. Disconnect all wiring harness connectors and any ground straps attached to the fuse box, releasing retaining clips as needed. 8. Remove the fuse box mounting fasteners; keep fasteners and any brackets together and noted for reinstallation. 9. Carefully lift the fuse box assembly straight out, avoiding bending wires or stressing connectors, and set it on a clean, static-safe surface. 10. Inspect the fuse box, wiring, and connectors for corrosion, heat damage, or melted insulation while it is removed. Installation steps 1. Confirm the high-voltage system is de-energized (if applicable) and that the 12-volt battery remains disconnected before starting installation. 2. Position the fuse box into place without forcing it; ensure wiring harnesses are routed free of pinch points and heat sources. 3. Reinstall mounting fasteners and any brackets, snugging them securely by hand or with tools (do not rely on guessed torque values). 4. Reconnect all harness connectors and ground straps, making sure locking tabs engage and connections are fully seated. 5. Reinstall any fuses or fusible links in their original locations using the correct type and rating. 6. Replace protective covers, trim, and panels that were removed to access the fuse box. 7. Restore the high-voltage service (if applicable) following manufacturer procedure or have a qualified technician do so. 8. Reconnect the 12-volt battery only after the fuse box is secured and connectors are attached. 9. Power up the vehicle, turn the ignition to the ON position, and verify operation of circuits protected by the fuse box; check for warning lights and blown fuses. 10. Scan for diagnostic trouble codes and clear or address any codes; recheck connector security and inspect for abnormal heat or smells after initial testing. Repair tip: keep photos and labels from removal handy during installation, use dielectric grease sparingly on exposed terminals, and replace any brittle or corroded connectors rather than reusing them.
- Q:
Why choose Toyota Parts Deal
- Dedicated Service
Your complete satisfaction is our #1 goal
- Lowest Prices
Best deals on genuine OE parts from dealerships
- Fast Delivery
Orders are processed and delivered promptly