

My Garage
My Account
Cart
Additional information needed to check if this part fits
2004 Toyota 4Runner
Check another vehicle- Production Date: 08/2002-08/2004
- Fitting Vehicle Options: GRN21#, UZN21#.. SR5
Toyota 52119-35050 Front Bumper Cover
2003-2005 Toyota 4Runner 5211935050
Customer Questions & Expert Answers (5)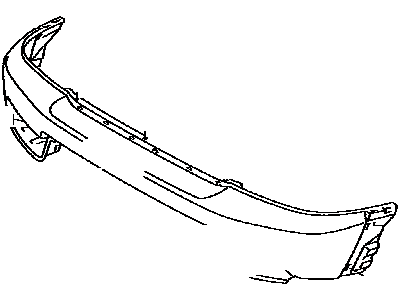
- Part DescriptionCover, Front Bumper
- Part Name Code52119A
- PositionFront
- ManufacturerToyota
Additional information needed to check if this part fits
2004 Toyota 4Runner
Check another vehicle- Production Date: 08/2002-08/2004
- Fitting Vehicle Options: GRN21#, UZN21#.. SR5
$126.35 MSRP: $179.63
You Save: $53.28 (30%)
Ships in 1-3 Business Days
1
- Related Parts
- Specifications
- Q&A
Product Specifications
Brand Genuine Toyota Part Name Code 52119A Manufacturer Part Number 52119-35050 Part Description Cover, Front Bumper Other Names Bumper Cover Item Dimensions 73.4 x 11.3 x 8.1 inches Item Weight 7.80 Pounds Position Front Condition New Fitment Type Direct Replacement Manufacturer Toyota SKU 52119-35050 Warranty This genuine Toyota part is covered by warranty. Shipping & Return Shipping Policy Return Policy Warning: California's Proposition 65Customer Questions & Expert Answers
- Q:Will the 52119-35050 fit my car? Posted by ToyotaPartsDeal Specialist
- A:You can Select Your Vehicle to check if 52119-35050 fits your vehicle.Posted by ToyotaPartsDeal Specialist
Installation and Repair Tips- Q:How to remove and install the front and rear bumpers on 2003 through 2009 Toyota 4Runner? Posted by Customer
- A:To replace the front bumper, begin by applying the parking brake, raising the vehicle, and securely supporting it on jackstands. Remove the lower splash shield and the fasteners that secure the front of the inner fender splash shields. Next, detach the fasteners at the top of the bumper cover, followed by those on the sides and bottom. Slightly pull the cover outward and disconnect any fog light connectors if present, then remove the cover from the vehicle. For installation, reverse the removal steps, ensuring that any tabs on the back of the bumper cover fit into the corresponding clips on the body before securing with bolts and screws, ideally with assistance. For the rear bumper, start by removing the rear mud flaps and then the upper bolts in the rear wheelwell that secure the edge of the bumper cover. Detach the fasteners at the bottom of the bumper cover, then open the liftgate to access and remove the fasteners on the inside edge of the bumper cover. Finally, pull the bumper cover out and away from the vehicle, and for installation, follow the reverse order of removal.Posted by ToyotaPartsDeal Specialist
- Additional Installation and Repair Tips by AI Expert
- Removal steps: 1. Park on level ground, set the parking brake, chock wheels, wear safety glasses and gloves, and support the vehicle with jack stands if you must raise it. 2. If the bumper has electrical components, disconnect the negative battery terminal before touching any wiring; if the vehicle has supplemental restraint (airbag/impact) components associated with the bumper, follow the manufacturer's SRS precautions and wait the manufacturer-specified time before proceeding. 3. Remove any obstructing splash shields, lower covers, or trim pieces that block access to the bumper fasteners. 4. Remove the visible fasteners (bolts, screws, clips, retainers) that secure the bumper to the vehicle; locations and fastener types vary by design. 5. If present, unplug fog lamp, parking sensor, or other electrical connectors and remove bulbs or modules as needed-use release tabs and avoid pulling on wires. 6. Support the bumper by hand or with a helper/stand, then carefully disengage it from body hooks, tabs, and clips; if clips are tight, use a trim tool to avoid bending the bumper. 7. Place the bumper on a padded surface and inspect mounting brackets, clips, wiring, and attached components for damage. Installation steps: 1. Compare the replacement bumper to the old one and transfer any required brackets, grilles, sensors, or trim pieces before installing. 2. Reconnect any bumper-mounted electrical connectors to their components but keep the negative battery terminal disconnected until the bumper is fully secured if SRS components are involved (follow manufacturer guidance). 3. Position and support the bumper, aligning hooks, tabs, and mounting points; engage clips and seat the bumper gently to the body. 4. Install and snug the fasteners by hand first, then progressively tighten to a firm fit-do not apply guessed torque values. 5. Reinstall splash shields, wheel liners, and any removed trim pieces; ensure wiring is routed and secured away from pinch points and moving parts. 6. Reconnect the negative battery terminal, clear tools from the work area, then test lights, sensors, and other electrical functions; if any warning lights (especially SRS) remain, consult a service manual or qualified technician. 7. Verify bumper alignment and secure fit, lower the vehicle if raised, and perform a short road check for noise or movement. Repair tip: 1. Use painter's tape on adjacent paint and keep fasteners organized in bags labeled by location to simplify reassembly.
- Q:is this the bumper cover that fits an 2005 4 runner limited? with fog light holes ? Posted by Customer: 2005 Toyota 4Runner
- A:YOU WILL NEED 52119-35901 FOR YOUR 4RUNNER.Posted by ToyotaPartsDeal Specialist 21/5/2025
- Q:Both this part and part no 52119-35901 are shown to fit my 4Runner. Which one is the bumper that goes on in plain grey (is not primed and needs to be painted)? Posted by Customer: 2003 Toyota 4Runner
- A:52119-35050 CORRECT PART NUMBERPosted by ToyotaPartsDeal Specialist 15/3/2022
- Q:
Why choose Toyota Parts Deal
- Dedicated Service
Your complete satisfaction is our #1 goal
- Lowest Prices
Best deals on genuine OE parts from dealerships
- Fast Delivery
Orders are processed and delivered promptly