My Garage
My Account
Cart
This part fits
1997 Toyota Land Cruiser
Check another vehicle- Production Date: 08/1992-01/1998
- Fitting Vehicle Options: FZJ80
Toyota 90982-08264 Fusible Link
1991-1997 Toyota Land Cruiser 9098208264
Customer Questions & Expert Answers (2)


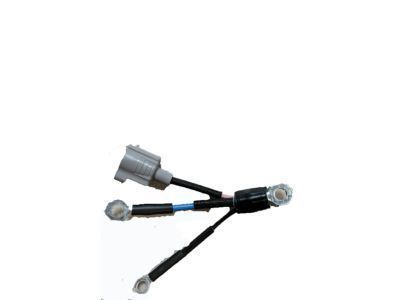

- Part DescriptionFusible Link
- L=110,MAIN,GLOW,AM2
- Part Name Code82210C
- ManufacturerToyota
This part fits
1997 Toyota Land Cruiser
Check another vehicle- Production Date: 08/1992-01/1998
- Fitting Vehicle Options: FZJ80
$19.62 MSRP: $27.42
You Save: $7.80 (29%)
Ships in 1-3 Business Days
1
- Related Parts
- Specifications
- Q&A
Product Specifications
Brand Genuine Toyota Part Name Code 82210C Manufacturer Part Number 90982-08264 Part Description Fusible Link Item Dimensions 14.1 x 11.9 x 2.2 inches Item Weight 0.50 Pounds Condition New Fitment Type Direct Replacement Manufacturer Toyota SKU 90982-08264 Warranty This genuine Toyota part is covered by warranty. Shipping & Return Shipping Policy Return Policy Warning: California's Proposition 65Customer Questions & Expert Answers
- Q:I would like to know availability and if it is direct fit replacement Posted by ToyotaPartsDeal Specialist
- A:You can Select Your Vehicle to check if 90982-08264 fits your vehicle.Posted by ToyotaPartsDeal Specialist
- Installation and Repair Tips by AI Expert
- Removal steps 1. Park on level ground, set the parking brake, turn the ignition off and remove the key; wear safety glasses and gloves. 2. Locate the fuse panel or in-line fuse assembly (location and access method vary by design). 3. Disconnect the negative battery cable; for some designs additional isolation may be required-wait a few minutes for systems to discharge. 4. Open or remove the fuse panel cover or access panel (release clips or fasteners as needed; methods vary). 5. Use the panel diagram or owner's manual to confirm the correct fuse and its rating before touching it. 6. Remove the fuse with a plastic fuse puller or insulated pliers, avoiding contact between metal tools and other terminals. 7. Inspect the fuse and the fuse holder for corrosion, melting, loose contacts, or damage before proceeding. Installation steps 1. Obtain the correct replacement fuse type and amperage - do not substitute a higher rating. 2. If the fuse holder or terminals are corroded or damaged, repair or replace the holder before installing the fuse. 3. Insert the new fuse into the correct slot, seating it fully with a plastic puller or insulated tool. 4. Reinstall the panel cover or access panel and secure any fasteners or clips that were removed. 5. Reconnect the negative battery cable and restore any battery isolators; be aware some equipment may require reprogramming after power loss. 6. Turn the ignition on and test the circuit(s) protected by the fuse for correct operation. 7. If the replacement fuse blows immediately or the circuit fails, disconnect the battery and have the circuit diagnosed rather than repeatedly replacing fuses. 8. Final check: ensure the fuse panel cover is secure and there are no loose wires or heat-damaged components. Repair tip 1. Keep a small assortment of common fuse amperages and a plastic fuse puller in the vehicle for quick, safe replacements.
- Q:
Why choose Toyota Parts Deal
- Dedicated Service
Your complete satisfaction is our #1 goal
- Lowest Prices
Best deals on genuine OE parts from dealerships
- Fast Delivery
Orders are processed and delivered promptly