My Garage
Cart
Make sure this part fits

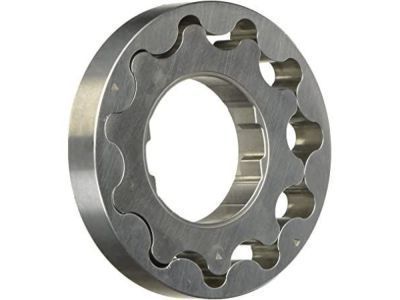
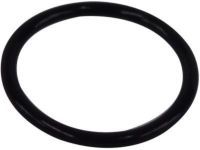
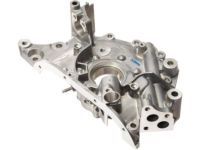
Toyota 15103-0P010 Rotor Set, Oil Pump

2003-2018 Toyota 151030P010

Customer Questions & Expert Answers (10)
Toyota 15103-0P010 Rotor Set, Oil Pump
  • Part Description
    Rotor Set, Oil Pump
  • Part Name Code
    15102
  • Replaces
    15103-31050
  • Manufacturer
    Toyota
Make sure this part fits
$54.93 MSRP: $76.77
You Save: $21.84 (29%)
Ships in 1-3 Business Days
1
ADD TO CART
  • Related Parts
  • Product Specifications
  • Vehicle Fitment
  • Customer Questions & Expert Answers
  • Product Specifications

    BrandGenuine Toyota
    Part Name Code15102
    Manufacturer Part Number15103-0P010
    Part DescriptionRotor Set, Oil Pump
    Other NamesOil Pump, Oil Slinger, Rotor, Rotor Assembly
    Manufacturer Note(L)
    Item Dimensions0.7 x 0.2 x 0.3 inches
    Item Weight0.40 Pounds
    ConditionNew
    Fitment TypeDirect Replacement
    Replaces15103-31050
    ManufacturerToyota
    SKU15103-0P010
    WarrantyThis genuine Toyota part is guaranteed by Toyota's factory warranty.
    Shipping & ReturnShipping Policy Return Policy
    Warning: California's Proposition 65
  • Vehicle Fitment

    Year Make Model Trim & Engine Important vehicle option details
    2003-2009 Toyota 4RunnerLimited, SR5|6 Cyl 4.0L, 8 Cyl 4.7L1GRFE, 2UZFE; GRN210L-GKAGKA, GRN210L-GKAZKA, GRN210L-GKPGKA, GRN210L-GKPZKA, GRN215L-GKAGKA, GRN215L-GKAZKA, GRN215L-GKPGKA, GRN215L-GKPZKA, UZN210L-GKAGKA, UZN210L-GKAZKA, UZN215L-GKAGKA, UZN215L-GKAZKA
    2005-2018 Toyota AvalonLimited, XL, XLE, XLE Premium, XLE Touring Or Touring, XLS|4 Cyl 2.5L, 6 Cyl 3.5L2ARFXE, 2GRFE; AVX40L-AEXGBA, 2GRFE; GSX30L-AEAGKA, AVX40L-AEXPBA, GSX30L-AEAGKA, GSX30L-AEANKA, GSX30L-AEAPKA, GSX30L-AETGKA, GSX30L-AETNKA, GSX30L-AETPKA, GSX40L-AETGKA, GSX40L-AETPKA, GSX40L-AETQKA
    2007-2017 Toyota CamryLE, N, SE, XLE, XSE|4 Cyl 2.4L, 4 Cyl 2.5L, 6 Cyl 3.5L2ARFE, 2ARFXE, 2AZFE, 2GRFE; ACV40L-AEAGKA, 2GRFE; ACV40L-CEAGKA, 2GRFE; ASV50L-CETEKA, ACV40L-AEANKA, ACV40L-AEMNKA, ACV40L-CEANKA, ACV40L-CEASKA, ACV40L-CEMNKA, ACV40L-CEMSKA, ASV40L-AETGKA, ASV40L-AETNKA, ASV40L-CEFNKA, ASV40L-CEFSKA, ASV40L-CETGKA, ASV40L-CETNKA, ASV40L-CETSKA, ASV50L-CETEKA, ASV50L-CETGKA, ASV50L-CETNKA, ASV50L-CETPKA, ASV50L-CETSKA, AVV50L-CEXGBA, AVV50L-CEXNBA, AVV50L-CEXSBA, GSV40L-AETGKA, GSV40L-AETNKA, GSV40L-CETGKA, GSV40L-CETNKA, GSV40L-CETSKA, GSV50L-CETGKA, GSV50L-CETSKA
    2007-2010 Toyota FJ Cruiser6 Cyl 4.0L1GRFE; GSJ10L-GKASKA, GSJ15L-GKASKA, GSJ15L-GKFSKA
    2008-2017 Toyota HighlanderGrande, Limited, Medium, STD, Sport|4 Cyl 2.7L, 6 Cyl 3.3L, 6 Cyl 3.5L1ARFE, 2GRFE, 2GRFKS, 2GRFXE, 2GRFXS, 2GRFXS; ASU40L-ARTNKA, 3MZFE; ASU40L-ARTNKA, ASU40L-BRTNKA, ASU50L-ARTNKA, GSU40L-ARAGKA, GSU40L-ARAMKA, GSU40L-ARANKA, GSU40L-ARASKA, GSU40L-BRAGKA, GSU40L-BRAMKA, GSU40L-BRANKA, GSU40L-BRASKA, GSU45L-ARAGKA, GSU45L-ARAMKA, GSU45L-ARANKA, GSU45L-ARASKA, GSU45L-BRAGKA, GSU45L-BRAMKA, GSU45L-BRANKA, GSU45L-BRASKA, GSU50L-ARTGKA, GSU50L-ARTMKA, GSU50L-ARTNKA, GSU50L-ARZGHA, GSU50L-ARZMHA, GSU50L-ARZNHA, GSU55L-ARTGKA, GSU55L-ARTMKA, GSU55L-ARTNKA, GSU55L-ARZGHA, GSU55L-ARZMHA, GSU55L-ARZNHA, GVU48L-BRXGKA, GVU48L-BRXNKA, GVU58L-ARXGHA, GVU58L-ARXGKA, GVU58L-ARXMHA, GVU58L-ARXMKA, GVU58L-ARXNHA, GVU58L-ARXNKA, MHU48L-BRXMKA, MHU48L-BRXNKA
    2006-2012 Toyota RAV4Limited, STD, Sport, X|4 Cyl 2.4L, 4 Cyl 2.5L, 6 Cyl 3.5L2ARFE, 2AZFE, 2GRFE; ACA33L-ANPGKA, 2GRFE; ASA33L-CNPGKA, ACA33L-ANPGKK, ACA33L-ANPSKA, ACA33L-ANPSKK, ACA33L-ANPXKA, ACA33L-ANPXKK, ACA38L-ANPGKA, ACA38L-ANPSKA, ACA38L-ANPXKA, ASA33L-ANPGKA, ASA33L-ANPGKK, ASA33L-ANPSKA, ASA33L-ANPSKK, ASA33L-ANPXKA, ASA33L-ANPXKK, ASA33L-CNPGKA, ASA33L-CNPGKK, ASA33L-CNPSKA, ASA33L-CNPSKK, ASA33L-CNPXKA, ASA33L-CNPXKK, ASA38L-ANPGKA, ASA38L-ANPSKA, ASA38L-ANPXKA, ASA38L-CNPGKA, ASA38L-CNPGKK, ASA38L-CNPSKA, ASA38L-CNPSKK, ASA38L-CNPXKA, ASA38L-CNPXKK, GSA33L-ANAGKA, GSA33L-ANAGKK, GSA33L-ANASKA, GSA33L-ANASKK, GSA33L-ANAXKA, GSA33L-ANAXKK, GSA33L-CNAGKA, GSA33L-CNAGKK, GSA33L-CNASKA, GSA33L-CNASKK, GSA33L-CNAXKA, GSA33L-CNAXKK, GSA38L-ANAGKA, GSA38L-ANASKA, GSA38L-ANAXKA, GSA38L-CNAGKA, GSA38L-CNAGKK, GSA38L-CNASKA, GSA38L-CNASKK, GSA38L-CNAXKA, GSA38L-CNAXKK
    2006-2017 Toyota SiennaCE, LE, SE, STD, XLE|4 Cyl 2.7L, 6 Cyl 3.3L, 6 Cyl 3.5L1ARFE, 2GRFE, 2GRFKS, 2GRFKS; ASL30L-PFTEKA, 3MZFE; ASL30L-PFTEKA, 3MZFE; GSL20L-PFADKK, ASL30L-PRTEKA, GSL20L-PFADKK, GSL20L-PFAEKA, GSL20L-PFAEKK, GSL20L-PFAQKA, GSL20L-PFAQKK, GSL20L-PRADKK, GSL20L-PRAEKA, GSL20L-PRAEKK, GSL20L-PRAQKA, GSL20L-PRAQKK, GSL23L-SBADKA, GSL23L-SBADKK, GSL25L-PFADKK, GSL25L-PFAEKA, GSL25L-PFAEKK, GSL25L-PFAQKA, GSL25L-PFAQKK, GSL30L-PFTDKA, GSL30L-PFTEKA, GSL30L-PFTQKA, GSL30L-PFZDHA, GSL30L-PFZEHA, GSL30L-PFZQHA, GSL30L-PRTEKA, GSL30L-PRTQKA, GSL30L-PRTSKA, GSL30L-PRZEHA, GSL30L-PRZQHA, GSL30L-PRZSHA, GSL33L-SBTDKA, GSL33L-SBZDHA, GSL33L-SEZDHA, GSL35L-PFTDKA, GSL35L-PFTEKA, GSL35L-PFTQKA, GSL35L-PFZEHA, GSL35L-PFZQHA, MCL20L-PFADKK, MCL20L-PFAEKA, MCL20L-PFAEKK, MCL20L-PFAQKA, MCL20L-PFAQKK, MCL20L-PRADKK, MCL20L-PRAEKA, MCL20L-PRAEKK, MCL20L-PRAQKA, MCL20L-PRAQKK, MCL23L-SBADKA, MCL23L-SBADKK, MCL25L-PFADKK, MCL25L-PFAEKA, MCL25L-PFAEKK, MCL25L-PFAQKA, MCL25L-PFAQKK
    2005-2016 Toyota TacomaBase, Limited, SR5|4 Cyl 2.7L, 6 Cyl 3.5L, 6 Cyl 4.0L1GRFE, 2GRFKS, 2TRFE; GRN225L-CRFDKA, GRN245L-CRADKA, GRN245L-CRFDKA, GRN245L-PRADKA, GRN245L-PRFDKA, GRN250L-PRADKA, GRN265L-CRADKA, GRN265L-CRFDKA, GRN265L-PRADKA, GRN270L-PRADKA, GRN305L-CRFSHA, GRN305L-CRTSHA, GRN305L-PRFSHA, GRN305L-PRTLHA, GRN305L-PRTSHA, GRN310L-PRTLHA, GRN310L-PRTSHA, GRN325L-CRTSHA, GRN325L-PRTLHA, GRN325L-PRTSHA, GRN330L-PRTLHA, GRN330L-PRTSHA, TRN220L-TRMDKA, TRN220L-TRPDKA, TRN225L-CRMDKA, TRN225L-CRPDKA, TRN225L-PRPDKA, TRN240L-TRMDKA, TRN240L-TRPDKA, TRN245L-CRMDKA, TRN245L-CRMSKA, TRN245L-CRPDKA, TRN245L-CRTSKA, TRN260L-TRMDKA, TRN265L-CRMDKA, TRN265L-CRPDKA, TRN265L-CRTSKA, TRN265L-PRPDKA, TRN265L-PRTSKA
    2004-2011 Toyota TundraDLX, Limited, SR5|6 Cyl 3.4L, 6 Cyl 4.0L, 8 Cyl 4.6L, 8 Cyl 4.7L, 8 Cyl 5.7L1GRFE, 1URFE, 2UZFE, 3URFBE, 3URFE, 5VZFE; GSK30L-ARBSKA, GSK30L-ARFSKA, GSK30L-TRBDKA, GSK30L-TRBDKK, GSK30L-TRFDKA, GSK50L-TRADKA, GSK51L-CRASKA, GSK51L-THADKA, UCK30L-ARBLKA, UCK30L-ARBSKA, UCK30L-ARBSKK, UCK30L-ARSLKA, UCK30L-ARSSKA, UCK30L-ARSSKK, UCK30L-ASBLKA, UCK30L-ASBSKA, UCK30L-ASSLKA, UCK30L-ASSSKA, UCK30L-TRBDKA, UCK31L-PRBLKA, UCK31L-PRBSKA, UCK31L-PRBSKK, UCK31L-PRSLKA, UCK31L-PRSSKA, UCK31L-PRSSKK, UCK40L-ARBLKA, UCK40L-ARBLKK, UCK40L-ARBSKA, UCK40L-ARBSKK, UCK40L-ARSLKA, UCK40L-ARSLKK, UCK40L-ARSSKA, UCK40L-ARSSKK, UCK40L-ASBLKA, UCK40L-ASBSKA, UCK40L-ASSLKA, UCK40L-ASSSKA, UCK40L-TRBDKA, UCK40L-TRBDKK, UCK40L-TRSDKK, UCK40L-TRSSKA, UCK41L-PRBLKA, UCK41L-PRBLKK, UCK41L-PRBSKA, UCK41L-PRBSKK, UCK41L-PRSLKA, UCK41L-PRSLKK, UCK41L-PRSSKA, UCK41L-PRSSKK, UCK50L-TRADKA, UCK51L-CRALKA, UCK51L-CRASKA, UCK51L-PSALKA, UCK51L-PSASKA, UCK51L-THADKA, UCK52L-CHASKA, UCK55L-TRADKA, UCK56L-CRALKA, UCK56L-CRASKA, UCK56L-PSALKA, UCK56L-PSASKA, UCK56L-THADKA, UCK57L-CHASKA, UPK50L-TRTDKA, UPK51L-CRTLKA, UPK51L-CRTSKA, UPK51L-PSTLKA, UPK51L-PSTSKA, UPK51L-THTDKA, UPK52L-CHTSKA, UPK55L-TRTDKA, UPK56L-CRTLKA, UPK56L-CRTSKA, UPK56L-PSTLKA, UPK56L-PSTSKA, UPK56L-THTDKA, UPK57L-CHTSKA, USK50L-TRTDKA, USK51L-CRTLKA, USK51L-CRTSKA, USK51L-PSTLKA, USK51L-PSTSKA, USK51L-THTDKA, USK52L-CHTSKA, USK55L-TRTDGA, USK55L-TRTDKA, USK56L-CRTLGA, USK56L-CRTLKA, USK56L-CRTSGA, USK56L-CRTSKA, USK56L-PSTLGA, USK56L-PSTLKA, USK56L-PSTSGA, USK56L-PSTSKA, USK56L-THTDGA, USK56L-THTDKA, USK57L-CHTSGA, USK57L-CHTSKA, VCK30L-ARMSKA, VCK30L-ARSSKA, VCK30L-TRMDKA, VCK30L-TRSDKA, VCK30L-TRSDKK, VCK40L-ARMSKA, VCK40L-ARSSKA
    2009-2017 Toyota VenzaN|4 Cyl 2.7L, 6 Cyl 3.5L1ARFE, 2GRFE; AGV10L-AWTGKA, AGV15L-AWTGKA, GGV10L-AWTGKA, GGV15L-AWTGKA
  • Customer Questions & Expert Answers

    Q:
    Does it fit my car? Posted by ToyotaPartsDeal Specialist
    A:
    You can Select Your Vehicle to check if 15103-0P010 fits your vehicle.
    Posted by ToyotaPartsDeal Specialist
    Q:
    How to remove, inspect, and install the oil pump in 3.0L and 3.3L V6 engine on Toyota Sienna? Posted by Customer
    A:
    To remove the oil pan, first take off the timing belt and lower timing belt idler pulley, followed by the crankshaft sprocket and the oil pick-up tube. Next, unbolt the alternator and set it aside without disconnecting the refrigerant lines, then remove the compressor bracket. Detach the power steering pump by removing the adjusting bar and prying it away from the oil pump body. Use a 10 mm hex bit or Allen wrench to remove the lower timing belt idler pulley, then detach the oil pump from the engine by removing the bolts, prying carefully if necessary. Remove the O-ring and the oil pressure relief valve components, then use a large Phillips screwdriver to take off the screws retaining the body cover of the oil pump, lift the cover, and remove the pump rotors. Clean all components with solvent, inspect for wear and damage, and check the oil pressure relief valve and spring for any issues. Measure the clearance of the driven rotor-to-body, rotor side, and rotor tip using a feeler gauge. For installation, pry out the old crankshaft seal, apply grease or engine oil to the new seal, and drive it into place. Place the drive and driven rotors into the pump body with the marks facing out, pack the pump cavity with petroleum jelly, and install the cover, tightening the screws in a criss-cross pattern. Lubricate the oil pressure relief valve and install its components, then clean the gasket surfaces with acetone or lacquer thinner. Apply a bead of anaerobic sealer to the oil pump, position a new O-ring on the block, engage the oil pump drive rotor with the crankshaft, and slide the pump into place. Install the oil pump mounting bolts and tighten them, then use a new gasket to install the oil pick-up tube. Reinstall the remaining parts in reverse order, add oil, start the engine, check for leaks, and recheck the engine oil level.
    Posted by ToyotaPartsDeal Specialist
    Q:
    How to remove, inspect, and install the oil pump in four cylinder engine on 2005 through 2009 Toyota Tacoma? Posted by Customer
    A:
    To remove the timing chain cover, which houses the oil pump, begin by taking off the relief plug from the bottom of the pump, ensuring to catch the spring as it is removed, and lay out the components in order. Next, remove the bolts and lift off the oil pump cover, followed by lifting out the drive and driven rotors. For inspection, clean all components with solvent and check for wear and damage, paying special attention to the oil pressure relief valve piston sliding surface and valve spring; if either is damaged, replace them as a set, ensuring the valve slides freely. Measure the clearances of the driven rotor-to-body, rotor-to-cover, and rotor lip using a feeler gauge, and if any are excessive, replace the rotors as a set and, if necessary, the oil pump body. During installation, lubricate the drive and driven rotors with clean engine oil and place them in the pump body with the small marks facing out. Pack the pump cavities with petroleum jelly to aid in priming when the engine starts, install a new O-ring in the timing chain cover groove, and attach the pump, tightening the screws to the specified torque. Lubricate the oil pressure relief valve piston with clean engine oil and reinstall the valve components in the pump body. Finally, install the timing cover onto the engine block, ensuring the oil pump drive gear engages with the crankshaft gear, then reinstall the remaining parts in reverse order of removal. Change the engine oil and filter, add coolant, start the engine, and check for oil pressure and leaks.
    Posted by ToyotaPartsDeal Specialist
    Q:
    How to remove, inspect, and install Oil Pump in V6 engine on 2005 through 2009 Toyota Tacoma? Posted by Customer
    A:
    Before now, unscrew both of the timing chain cover mounting bolts and then uncouple the coupling of the oil pipe that is mounted between the timing chain cover and the block and get rid of the two worn out oil pipe O-rings. After that, use a spanner while holding the oil pump with another hand to loosen the oil pump cover bolts and thereafter, the oil pump cover, the oil pump drive rotor and the driven rotor. Remove oil pressure relief plug, valve spring and valve from the oil pump cover. Wipe all parts with solvent and have a close look at their status: the oil relief valve should move effortlessly inside its hole. Examine the contact face of the oil pressure relief valve and the valve spring; if either of the components is defective, replace them together. By using a feeler gauge measure the following; the clearance of the driven rotor to the body, the rotor side, and the rotor tip and record the values and compare. Tap out the worn out crankshaft seal by referring to the timing chain cover, and apply multi-purpose grease or engine oil on the outer lip of the new crank seal before moulding it in. Smear the seal lip with petroleum jelly and do the same for the pump drive and driven rotors and then fit these in the timing chain cover whereby the pump marks are outward. Petroleum jelly must then be packed into the pump cavity of the motor to assist in the priming process of the pump; then the cover and the bolts will have to be secured with the correct torque. Coat the rag with clean engine oil and insert the oil pressure relief valve and spring into the pump cover and tightened the plug to the right torque tightness. Last but not least, replace the timing chain cover, and after completing the installation in the reverse sequence of the removal, pour the oil into the engine, fit the new filter and start the engine for the check the signs of leakage.
    Posted by ToyotaPartsDeal Specialist
    Q:
    How to remove and install the oil pump in V8 engine on Toyota Tundra? Posted by Customer
    A:
    Regarding the removal process, the oil pump is secured at the front of crankshaft for the 2UZ-FE engines whereas, for 1UR-FE, 3UR-FE, and 3UR-FBE engines it is fixed at the back side of timing chain cover. First you should detach the engine and after that oil pan, a pick-up tube and strainer. Subsequently, the timing belt and the idler pulleys must be detached followed by the crankshaft timing sprocket and the position sensor, together with the fact that the oil pump body can be found behind the crankshaft sprocket. To remove the oil pump off the engine, disconnect and us the oil filter/cooler assembly and altogether pull out eight mounting bolts. If the pump is stuck with the float then one should gently get it unscrewed at particular points so that damage is not done to this part. Pull out the O-ring from the bottom part of the engine and the plug located at the end of the oil pump so you can put out the retainer, spring, and the valve. For 1UR-FE, 3UR-FE, 3UR-FBE engines the timing chain cover is to be taken off. Using a large Philips screwdriver, unscrew the screws holding the body cover in place across the rear part of the oil pump housing, and prise off the cover and take out the rotors for the pump. Ensure the mating surfaces ar clean. For instillation, insert the drive and driven rotors into pump body in such a way that the marked face is outward and fill the pump casing with petroleum jelly before placing the cover and can the body with screws in a cross-wise manner. Engine oil should be applied to the oil pressure relief valve then all the parts of this valve should be fitted. For 2UZ-FE engine, place a 2 to 3 mm broad band of RTV sealant on the oil pump to confirm that assembly is done within 5 minutes. Place another fresh O-ring over the block on the top of the oil pump, make sure the teeth of the drive rotor of the oil pump engages the crankshaft, and install the pump. Bolt up the oil pump mounting bolts and torque them to the standard, war to a cross pattern and then fit the oil pick-up pipe with a new gasket. Replace the remaining parts in reverse manner, add the engine oil and the coolant then start the engine and.verify for any leakage. For 1UR-FE, 3UR-FE, and 3UR-FBE engines-new O-rings are to be installed to inlet pipe and oil pump, mounting bolts tightened, the rest of the components replaced, engine oil and coolant filled in, starter motor engaged to check for leakage.
    Posted by ToyotaPartsDeal Specialist
    Q:
    What should you do after installing the oil pump for the 2006 Toyota Avalon? Posted by Customer
    A:
    After installing the oil pump, you need to install the drive chain and sprockets. Make sure that the colored links on the chain align with the alignment marks on the gears. Finally, tighten the lower drive sprocket retaining bolt.
    Posted by ToyotaPartsDeal Specialist
    See expert answers on similar Oil Pump
    Q:
    How is the oil pump body removed from the engine block for the 2014 Toyota Camry? Posted by Customer
    A:
    To remove the oil pump body from the engine block:Unfasten the three bolts securing the oil pump.If necessary, carefully use a screwdriver to pry it away from the engine block.
    Posted by ToyotaPartsDeal Specialist
    See expert answers on similar Oil Pump
    Q:
    How should you prepare for the installation of the new oil pump for the 2009 Toyota Camry? Posted by Customer
    A:
    Remove the old crankshaft seal from the timing chain cover and replace it with a new one, applying grease or oil to the outer edge and seal lip.
    Posted by ToyotaPartsDeal Specialist
    See expert answers on similar Oil Pump
    Q:
    How do you position and secure the oil pump during installation for the 2011 Toyota Highlander? Posted by Customer
    A:
    Position the oil pump and a new gasket against the block and install the mounting bolts. Then, tighten the bolts following a crisscross pattern to avoid warping the body.
    Posted by ToyotaPartsDeal Specialist
    See expert answers on similar Oil Pump
    Q:
    What should be done with the pump drive and driven rotors for the 2016 Toyota Highlander? Posted by Customer
    A:
    Apply a coat of petroleum jelly to the pump drive and driven rotors, then place the two rotors into position in the timing chain cover, ensuring that the pump marks (dimples) are facing out.
    Posted by ToyotaPartsDeal Specialist
    See expert answers on similar Oil Pump
    If you have any questions about this product, please don't hesitate to ask us. We will be happy to help you!

Genuine Toyota Part 15103-0P010, the Right Choice

Get the reliability of purchasing Toyota part # 15103-0P010 Rotor Set, Oil Pump. It is also referred to as Oil Pump. The first option should always be to use OEM parts. Toyota manufactures these components with high quality material and rigorously tested with high reliability and durability. This part fits 2003-2009 4Runner, 2007-2017 Camry, 2008-2017 Highlander, 2005-2016 Tacoma.

ToyotaPartsDeal.com is a leading supplier of genuine Toyota parts and accessories, such as 151030P010 Rotor Set, Oil Pump. In need of OEM Toyota parts? We offer a wide selection of genuine parts available that are competitively priced and trusted across the market. All parts are warranted by the manufacturer. Combine that with our simple return policy and fast delivery service and your shopping experience will be stress-free and dependable. For detailed Toyota parts information, click here.

Why choose Toyota Parts Deal

  • Dedicated Service

    Your complete satisfaction is our #1 goal

  • Lowest Prices

    Best deals on genuine OE parts from dealerships

  • Fast Delivery

    Orders are processed and delivered promptly