My Garage
Cart
Make sure this part fits

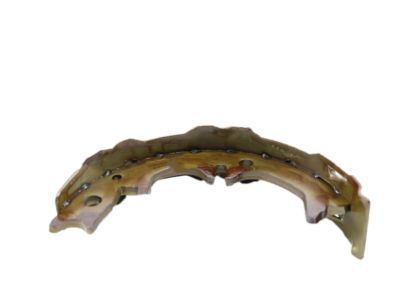
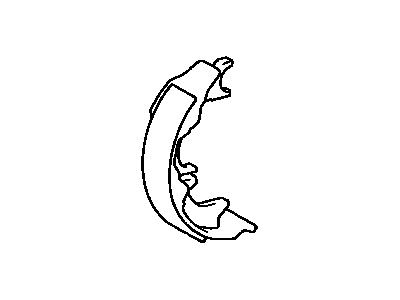
Toyota 46540-20070 Shoe Assembly, Parking Brake, LH

1994-2012 Toyota 4654020070

Customer Questions & Expert Answers (5)
Toyota 46540-20070 Shoe Assembly, Parking Brake, LH
  • Part Description
    Shoe Assy, Parking Brake, RH Or Center NO.1
  • Replaces
    46540-20060, 46540-07010
  • Manufacturer
    Toyota
Make sure this part fits
$32.15 MSRP: $44.94
You Save: $12.79 (29%)
Ships in 1-2 Business Days
1
ADD TO CART
  • Related Parts
  • Product Specifications
  • Vehicle Fitment
  • Customer Questions & Expert Answers
  • Product Specifications

    BrandGenuine Toyota
    Manufacturer Part Number46540-20070
    Part DescriptionShoe Assy, Parking Brake, RH Or Center NO.1
    Other NamesPark Brake Shoes, Shoe
    Item Dimensions13.0 x 5.3 x 2.7 inches
    Item Weight1.10 Pounds
    ConditionNew
    Fitment TypeDirect Replacement
    Replaces46540-20060, 46540-07010
    ManufacturerToyota
    SKU46540-20070
    WarrantyThis genuine Toyota part is guaranteed by Toyota's factory warranty.
    Shipping & ReturnShipping Policy Return Policy
    Warning: California's Proposition 65
  • Vehicle Fitment

    Year Make Model Trim & Engine Important vehicle option details
    1995-2012 Toyota AvalonLimited, XL, XLS|6 Cyl 3.0L, 6 Cyl 3.5L1MZFE; MCX10L-AEPGKA, 2GRFE; GSX30L-AEAGKA, GSX30L-AEANKA, GSX30L-AEAPKA, GSX30L-AETGKA, GSX30L-AETNKA, GSX30L-AETPKA, MCX10L-AEPGKK, MCX10L-AEPNKA, MCX10L-AEPNKK, MCX10L-AESGKA, MCX10L-AESGKK, MCX10L-AESNKA, MCX10L-AESNKK, MCX20L-AEPGKA, MCX20L-AEPGKK, MCX20L-AEPNKA, MCX20L-AEPNKK, MCX20L-AESGKA, MCX20L-AESNKA
    1997-2011 Toyota CamryCE, LE, SE, XLE|4 Cyl 2.2L, 4 Cyl 2.4L, 4 Cyl 2.5L, 6 Cyl 3.0L, 6 Cyl 3.3L, 6 Cyl 3.5L1MZFE, 2ARFE, 2AZFE, 2AZFXE, 2GRFE, 3MZFE, 5SFE, 5SFNE; ACV30L-AEAGKA, 5SFNE; ACV30L-CEAGKA, ACV30L-AEANKA, ACV30L-AEASKA, ACV30L-AEMNKA, ACV30L-AEMSKA, ACV30L-AEPGKA, ACV30L-AEPNKA, ACV30L-AEPSKA, ACV30L-CEAGKA, ACV30L-CEANKA, ACV30L-CEASKA, ACV30L-CEPGKA, ACV30L-CEPNKA, ACV30L-CEPSKA, ACV40L-AEAGKA, ACV40L-AEANKA, ACV40L-AEMNKA, ACV40L-CEAGKA, ACV40L-CEANKA, ACV40L-CEASKA, ACV40L-CEMNKA, ACV40L-CEMSKA, AHV40L-AEXGBA, AHV40L-CEXGBA, ASV40L-AETGKA, ASV40L-AETNKA, ASV40L-CEFNKA, ASV40L-CEFSKA, ASV40L-CETGKA, ASV40L-CETNKA, ASV40L-CETSKA, GSV40L-AETGKA, GSV40L-AETNKA, GSV40L-CETGKA, GSV40L-CETNKA, GSV40L-CETSKA, MCV20L-AEPDKK, MCV20L-AEPGKA, MCV20L-AEPGKK, MCV20L-AEPNKA, MCV20L-CEMDKA, MCV20L-CEMNKA, MCV20L-CEPDKK, MCV20L-CEPGKA, MCV20L-CEPGKK, MCV20L-CEPNKA, MCV20L-CEPNKK, MCV30L-AEAGKA, MCV30L-AEANKA, MCV30L-AEASKA, MCV30L-AEPGKA, MCV30L-AEPNKA, MCV30L-AEPSKA, MCV30L-CEAGKA, MCV30L-CEANKA, MCV30L-CEASKA, MCV30L-CEPGKA, MCV30L-CEPNKA, MCV30L-CEPSKA, MCV31L-AEASKA, MCV31L-CEASKA, SXV20L-AEMDKK, SXV20L-AEPDKK, SXV20L-AEPGKA, SXV20L-AEPNKA, SXV20L-AEPNKK, SXV20L-CEMDKA, SXV20L-CEMDKK, SXV20L-CEMNKK, SXV20L-CEPDKA, SXV20L-CEPDKK, SXV20L-CEPGKA, SXV20L-CEPNKA, SXV20L-CEPNKK, SXV23L-AEPNCA
    1994-1999 Toyota CelicaGT, ST|4 Cyl 1.8L, 4 Cyl 2.2L5SFE, 7AFE; AT200L-BCMSKA, AT200L-BCPSKA, AT200L-BLMSKA, AT200L-BLMSKK, AT200L-BLPSKA, AT200L-BLPSKK, ST204L-BCMGKA, ST204L-BCMGKK, ST204L-BCMSKA, ST204L-BCPGKA, ST204L-BCPGKK, ST204L-BCPSKA, ST204L-BKMGKA, ST204L-BKPGKA, ST204L-BLMGKA, ST204L-BLMGKK, ST204L-BLMSKA, ST204L-BLPGKA, ST204L-BLPGKK, ST204L-BLPSKA
    2001-2004 Toyota Highlander4 Cyl 2.4L, 6 Cyl 3.0L, 6 Cyl 3.3L1MZFE, 2AZFE, 3MZFE; ACU20L-BRPNKA, ACU20L-BWPNKA, ACU25L-BRPNKA, ACU25L-BWPNKA, MCU20L-BWPNKA, MCU23L-BRANKA, MCU23L-BWANKA, MCU25L-BWPNKA, MCU28L-BRANKA, MCU28L-BWANKA
    1999-2008 Toyota SolaraSE, SLE|4 Cyl 2.2L, 4 Cyl 2.4L, 6 Cyl 3.0L, 6 Cyl 3.3L1MZFE, 2AZFE, 3MZFE; ACV30L-GCAGKA, 5SFE; ACV20L-GCMNKA, ACV20L-GCPNKA, ACV20L-GCPNKK, ACV20L-GKPNKA, ACV30L-GCANKA, ACV30L-GCMNKA, ACV30L-GCPGKA, ACV30L-GCPNKA, MCV20L-GCMNKA, MCV20L-GCMNKK, MCV20L-GCPNKA, MCV20L-GCPNKK, MCV20L-GKPNKA, MCV20L-GKPNKK, MCV31L-GCAGKA, MCV31L-GCANKA, MCV31L-GKAGKA, MCV31L-GKANKA, SXV20L-GCMNKA, SXV20L-GCPNKA, SXV20L-GCPNKK, SXV20L-GKPNKA
  • Customer Questions & Expert Answers

    Q:
    Is the above part number correct or is there another correct number for my car? Posted by ToyotaPartsDeal Specialist
    A:
    You can Select Your Vehicle to check if 46540-20070 fits your vehicle.
    Posted by ToyotaPartsDeal Specialist
    Q:
    What are the steps and considerations for inspecting and maintaining brake system,Brake Booster and Parking Brake Shoe on 2007 through 2015 Toyota Avalon? Posted by Customer
    A:
    When you sense your car pulling to one side, when there is squealing or dragging noise from the brakes, excessive pedal travel, pedal pulsations or fluid leakages, ensure that the regular brake system inspections are carried out. The disc brake pads have built-in wear indicators which give out high-pitched noises like a squeal or scrape when they approach their replacement point and demand an immediate change of pads to avoid expensive damage to the discs. Start by loosening the wheel nuts, then lift up the vehicle and place it on jackstands. Remove the tires. For disc brakes, check pad thickness through inspection holes on each calliper while ensuring that lining material is above a specified thickness. If accurate measurement seems impossible or in case there are doubts about it, remove the caliper and pads for closer scrutiny. Wipe off pads with brake cleaner and remeasure using a steel pocket ruler or vernier caliper. Reveal disc thickness using micrometer; determine scoring, gouging, or burnt areas. In case of any problems with them think about disc resurfacing or doing away with them altogether by replacing with new ones. Before mounting your wheels inspect brake lines and hoses for cracks, worn out spots, rusting signs, leakage points as well as bends to make sure that they don't have any sharp edges on them; as well they should not interfere with moving parts in addition to exhaust components. Damaged lines as well as fittings are repaired or replaced if necessary. For rear parking brake shoes in disc brakes inspect lining thickness by removing rubber plug from front of disc or by removing rear brake caliper and disc for more comprehensive evaluation into this area of interest. Parking brake shoes should be replaced once lining material gets close to recessed rivets or metal shoes within 1/16 inch from them. Check springs and adjusting mechanisms as well as drum side of brake discs for even operation and distortions if there are any. When you are done, just tighten the wheel nuts, snug them down, lower the vehicle and then finally tighten the nuts to the prescribed torque specifications. Observe pedal movement when starting engine with brake full depressed to perform a brake booster check. While driving with the engine on, there should be no change in brake pedal travel or distance covered by it. Switch off for 30 seconds and re-start the engine to confirm reduced pedal travel with each subsequent application. One more thing left-check whether your parking brake is effective or not by counting clicks up of handle or down of pedal while pressing it until fully engaged. The number of clicks should match the specified count thus one needs to adjust parking brake accordingly. Alternatively, verify parking brake effectiveness by parking on a steep hill in Neutral; if the vehicle rolls, perform parking brake adjustments.
    Posted by ToyotaPartsDeal Specialist
    Q:
    How to inspect, remove, and reinstall Parking brake shoes on Toyota Camry? Posted by Customer
    A:
    Remove the brake disc. Inspect the shoe lining material's thickness; if worn down to 1/32-inch or less, replace the shoes. While you can replace the shoes without removing the hub and bearing assembly, space will be limited. Wash the brake parts with brake system cleaner before disassembling. For shoe replacement, follow this order: remove both the front and rear parking brake shoe return springs from their respective anchor pins and unhook them, take off the rear shoe hold-down spring and its pin, remove the shoe strut between the shoes, take out the front shoe hold-down spring and its pin, remove the adjuster and the tension spring, pop off the C-washer from the pivot pin on the rear shoe's back and detach the parking brake lever, apply high-temperature grease to the backing plate's contact surfaces and the front shoe's backside, slide the parking brake lever onto the pivot pin with a new C-washer, flip the shoes, install the adjuster ensuring its ends engage with the shoes, attach the tension spring to the rear shoe's backside, place the shoes in position, install the strut and its spring ensuring the strut's ends engage with the shoes, and finally, install both the front and rear shoe return springs followed by their respective hold-down springs. With the assembly done, install the brake disc and use three wheel lug nuts to secure it. Remove the hole plug from the disc and adjust the parking brake shoe clearance using a tool or screwdriver until shoe-disc contact prevents disc turning. Back off the adjuster by eight notches, then replace the hole plug, ensuring the shoes don't drag on the disc. Install the caliper mounting bracket, followed by the brake caliper, ensuring the bolts are tightened. Install the wheel, tightening the lug nuts. If your vehicle has a parking brake lever, it should travel between five and eight clicks when pulled. To bed the shoes to the drum, drive at 30 mph on a dry, level road. Apply the parking brake slightly, driving 1/4-mile like this, and repeat two or three times, letting the brakes cool in between.
    Posted by ToyotaPartsDeal Specialist
    Q:
    How to replace and adjust the Parking Brake Shoe on a 2002-2008 Toyota Solara? Posted by Customer
    A:
    Remove the brake disc and inspect the thickness of the lining material on the shoes; if the lining has worn down to 1/32-inch or less, the shoes must be replaced. Remove the hub and bearing assembly, noting that it is possible to perform the shoe replacement procedure without removing it, although working room is limited. Wash off the brake parts with brake system cleaner, ensuring to wash the parking brake assembly before disassembly. Follow the accompanying illustrations for the brake shoe replacement procedure, which includes removing various springs and pins, applying high-temperature grease to the backing plate, and properly installing the shoes, strut, and springs in order. Install the brake disc, temporarily threading three of the wheel lug nuts onto the studs to hold it in place. Remove the hole plug from the brake disc and adjust the parking brake shoe clearance by turning the adjuster star wheel until the shoes contact the disc and it can't be turned; back off the adjuster eight notches before reinstalling the hole plug. Install the torque plate and brake caliper, ensuring to tighten the bolts to the specified torque. Install the wheel and tighten the lug nuts to the specified torque. If equipped with a parking brake lever, pull up on the lever and count the number of clicks; it should be between three to six clicks, and if not, adjust the parking brake. To bed the shoes to the drum, drive the vehicle at approximately 30 mph on a dry, level road, applying the parking brake with specified force for 1/4-mile, and repeat this procedure two or three times, allowing the brakes to cool between applications.
    Posted by ToyotaPartsDeal Specialist
    Q:
    How to replace the rear Brake Shoe Set on a 2002-2008 Toyota Solara? Posted by Customer
    A:
    Loosen the wheel lug nuts, raise the rear of the vehicle, and support it securely on jackstands while blocking the front wheels to prevent rolling. Release the parking brake and remove the wheel, ensuring that all four rear brake shoes are replaced simultaneously but working on only one brake assembly at a time to avoid mixing parts. Clean the brake assembly with brake cleaner and allow it to dry, positioning a drain pan underneath to catch fluid and residue, avoiding the use of compressed air for brake dust. Unhook the return spring from the front brake shoe, using locking pliers to stretch the spring and pull it out. Depress the hold-down spring, turn the retainer 90 degrees, and release it; a special hold-down spring removal tool can simplify this task. Remove the front shoe from the backing plate, unhook the anchor spring, and take off the hold-down spring from the rear shoe. Remove the rear shoe and adjuster assembly, pulling the parking brake cable out of the lever with pliers, and remove the adjusting lever spring. Unhook the return spring from the shoe, slide off the adjuster and spring, and pry apart the C-washer to separate the parking brake lever and adjuster lever from the rear shoe. Assemble the new rear shoe with the parking brake lever and adjuster lever, crimping a new C-washer closed with pliers. Lubricate the adjuster screw with high-temperature grease, ensuring it is threaded in further than before for proper drum fit. Install the adjuster assembly on the rear shoe, ensuring proper fit, and hook the spring into the shoe opening. Lubricate the brake shoe contact areas, pull back the parking brake cable spring, and place the cable into the parking brake lever. Position the rear shoe assembly against the backing plate, push the hold-down pin through the shoe, install the cups, and lock the outer cup to the pin by turning it 90 degrees after compressing the spring. Connect the anchor spring to each shoe's bottom, mount the front shoe to the backing plate, and install the hold-down spring and cups. Stretch the return spring into the front shoe's hole with a screwdriver, verify the parking brake lever's return spring is hooked, and ensure the assembly is seated properly against the backing plate. If the brake drum cannot be easily removed, ensure the parking brake is fully released; if it still cannot be pulled off, retract the brake shoes by removing the plug from the backing plate and using a screwdriver to push the lever off the adjuster star wheel while turning the adjuster wheel. Check the drum for cracks, score marks, deep scratches, and hard spots before reinstalling; if any issues are found, take it to an automotive machine shop for resurfacing. Professionals recommend resurfacing drums with each brake job to prevent out-of-round conditions, and if drums cannot be resurfaced without exceeding the maximum allowable diameter, new ones are necessary. At a minimum, if not resurfacing, remove the glaze with emery cloth. Install the brake drum on the axle flange, followed by the wheel and lug nuts, then lower the vehicle and tighten the lug nuts to the specified torque. Make several forward and reverse stops and operate the parking brake to adjust the brakes for satisfactory pedal action, checking the operation of the brakes carefully before driving.
    Posted by ToyotaPartsDeal Specialist
    If you have any questions about this product, please don't hesitate to ask us. We will be happy to help you!

Genuine Toyota Part 46540-20070, the Right Choice

Get the reliability of purchasing Toyota part # 46540-20070 Shoe Assembly, Parking Brake, LH. It is also referred to as Brake Shoe Set, Parking Brake Shoe. The first option should always be to use OEM parts. Toyota manufactures these components with high quality material and rigorously tested with high reliability and durability. This part fits 1995-2012 Avalon, 1997-2011 Camry, 1994-1999 Celica, 2001-2004 Highlander.

ToyotaPartsDeal.com is a leading supplier of genuine Toyota parts and accessories, such as 4654020070 Shoe Assembly, Parking Brake, LH. In need of OEM Toyota parts? We offer a wide selection of genuine parts available that are competitively priced and trusted across the market. All parts are warranted by the manufacturer. Combine that with our simple return policy and fast delivery service and your shopping experience will be stress-free and dependable. For detailed Toyota parts information, click here.

Why choose Toyota Parts Deal

  • Dedicated Service

    Your complete satisfaction is our #1 goal

  • Lowest Prices

    Best deals on genuine OE parts from dealerships

  • Fast Delivery

    Orders are processed and delivered promptly