

My Garage
My Account
Cart
This part fits
2010 Toyota 4Runner
Check another vehicle- Production Date: 08/2009-08/2013
- Fitting Vehicle Options: TRN28#; GRN28#
Toyota 47314-60311 Front Brake Tube No.4
2009-2018 Toyota 4731460311
Customer Questions & Expert Answers (2)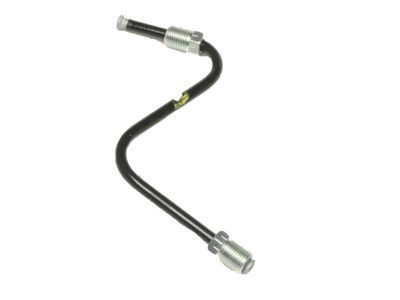
- Part DescriptionTube, Front Brake, NO.8
- Part Name Code47318
- PositionFront
- Replaces
- ManufacturerToyota
This part fits
2010 Toyota 4Runner
Check another vehicle- Production Date: 08/2009-08/2013
- Fitting Vehicle Options: TRN28#; GRN28#
$4.63 MSRP: $6.47
You Save: $1.84 (29%)
Ships in 1-3 Business Days
1
- Related Parts
- Specifications
- Q&A
Product Specifications
Brand Genuine Toyota Part Name Code 47318 Manufacturer Part Number 47314-60311 Part Description Tube, Front Brake, NO.8 Item Weight 0.50 Pounds Position Front Condition New Fitment Type Direct Replacement Replaces 47314-60310 Manufacturer Toyota SKU 47314-60311 Warranty This genuine Toyota part is covered by warranty. Shipping & Return Shipping Policy Return Policy Warning: California's Proposition 65Customer Questions & Expert Answers
- Q:Is the part number correct or is there another correct number for my car? Posted by ToyotaPartsDeal Specialist
- A:You can Select Your Vehicle to check if 47314-60311 fits your vehicle.Posted by ToyotaPartsDeal Specialist
- Installation and Repair Tips by AI Expert
- Removal steps 1. Park on level ground, chock wheels, set parking brake, wear safety glasses and gloves. 2. Disconnect the negative battery terminal and isolate it to prevent accidental ABS or pump activation. 3. Relieve system pressure by removing the master cylinder reservoir cap and gently depressing the brake pedal several times with the engine off; keep the cap off to avoid vacuum recharging. 4. Raise and safely support the vehicle if needed to access the line; remove wheels or splash shields only as required to reach the fittings. 5. Clean the area around fittings and place a drain pan and absorbent rags to catch brake fluid; protect painted surfaces from spilled fluid. 6. Identify and support the brake line ends; cap or plug open ports on the system to minimize contamination as soon as a connection is opened. 7. Use the correct flare-nut or line wrench to loosen hydraulic fittings; apply penetrating oil to corroded connections and avoid rounding nuts. 8. Remove any retaining clips or brackets holding the line; withdraw the line, catching fluid and avoiding kinks or damage to adjoining hoses. 9. Inspect the mating fittings, hoses, and mounting points for corrosion or damage and clean them before installing a replacement. Installation steps 1. Verify the replacement line matches the removed line in shape, length, and fitting type before installation. 2. Route the new line following the original path, keeping it clear of moving parts, sharp edges, and heat sources; secure with the original clips or appropriate replacements. 3. Install any banjo fittings with new crush washers or flare fittings with new seals as required by the design. 4. Start fittings by hand to avoid cross-threading, then tighten with a proper line or flare-nut wrench. Do not guess torque values-tighten to the manufacturer's specification. 5. Reinstall any removed shields, wheels, or components and lower the vehicle to ground when safe. 6. Refill the master cylinder reservoir with the specified type of fresh brake fluid and keep the reservoir cap off for bleeding. 7. Bleed the brake system using an appropriate sequence and method (two-person, pressure or vacuum bleeder); follow the vehicle's ABS bleed procedure if equipped, since it can vary. 8. Check all new fittings and connections for leaks while the system is pressurized and during bleeding. 9. Reconnect the negative battery terminal once bleeding and leak checks are complete. 10. Confirm pedal firmness at rest and after several pump cycles; perform a cautious low-speed road test to verify braking performance. 11. Dispose of used brake fluid and contaminated materials properly and clean any spilled fluid from painted surfaces immediately. Repair tip: use a flare-nut/line wrench to prevent rounding fittings, always use fresh fluid and new crush washers/seals where applicable, and avoid bending steel lines sharply-use a proper tube bender if shaping is required.
- Q:
Why choose Toyota Parts Deal
- Dedicated Service
Your complete satisfaction is our #1 goal
- Lowest Prices
Best deals on genuine OE parts from dealerships
- Fast Delivery
Orders are processed and delivered promptly