My Garage
My Account
Cart
This part fits
1976 Toyota Land Cruiser United States Of America; 6 Cyl 4.2L
Check another vehicle- Production Date: 09/1975-08/1977
- Fitting Vehicle Options: FJ40, 55
Toyota 42601-60071 Disc Wheel
1975-1978 Toyota Land Cruiser 4260160071
Customer Questions & Expert Answers (2)
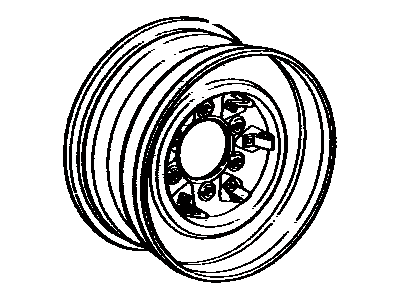
- Part DescriptionWheel, Disc (For Front)
- 5.5JJ-15,W/WHEEL CAP RETAINER
- Replaced By
- ManufacturerToyota
- Require Quantity2
- Package Quantity1
This part fits
1976 Toyota Land Cruiser United States Of America; 6 Cyl 4.2L
Check another vehicle- Production Date: 09/1975-08/1977
- Fitting Vehicle Options: FJ40, 55
$166.13 MSRP: $236.18
You Save: $70.05 (30%)
Ships in 1-3 Business Days
1
- Related Parts
- Specifications
- Q&A
Product Specifications
Brand Genuine Toyota Manufacturer Part Number 42601-60071 Part Description Wheel, Disc (For Front) Manufacturer Note 5.5JJ-15,W/WHEEL CAP RETAINER Item Dimensions 30.9 x 21.0 x 14.7 inches Item Weight 12.00 Pounds Condition New Fitment Type Direct Replacement Require Quantity 2 Manufacturer Toyota SKU 42601-60071 Warranty This genuine Toyota part is covered by warranty. Shipping & Return Shipping Policy Return Policy Warning: California's Proposition 65Customer Questions & Expert Answers
- Q:Is the above part number correct or is there another correct number for my car? Posted by ToyotaPartsDeal Specialist
- A:You can Select Your Vehicle to check if 42601-60071 fits your vehicle.Posted by ToyotaPartsDeal Specialist
- Installation and Repair Tips by AI Expert
- Removal 1. Park on level ground, set the parking brake, chock other wheels, and wear eye protection and gloves. 2. If the spare carrier has electrical components (lock, lamp, or winch), disconnect the negative battery cable before proceeding. 3. Inspect the carrier area so you understand how the spare is retained (bolt, lug nuts, winch, strap, or latch) and plan how you will support the wheel during release. 4. Support the spare with a jack, sling, or a helper before removing any fasteners to prevent it falling. 5. Loosen and remove the retaining fastener(s) or release the retention mechanism; keep removed hardware together and note its orientation. 6. Lower or slide the spare away from the carrier carefully, keeping hands clear of pinch points, and set the wheel flat on the ground or a safe surface. 7. Inspect the carrier, mounting flange, hardware, and any cables or electrical connectors for damage or corrosion and clean as needed. 8. Tip: take a photo of the mounted spare and hardware layout before removal to help with correct reinstallation. Installation 1. Verify the spare tire is serviceable and inflated to the correct pressure before installation. 2. If you previously disconnected the battery, reconnect the negative cable only after the tire is positioned and before testing any electrical components. 3. Position and support the spare at the carrier so it aligns with the mounting interface, using a jack or helper to hold it in place. 4. Start fasteners by hand to avoid cross-threading; for multiple fasteners, snug them progressively in a crossing pattern if applicable. 5. Fully engage any winch, latch, or retaining mechanism slowly and confirm the spare seats evenly and does not bind. 6. Tighten hardware to the vehicle manufacturer's specified procedure or torque (do not guess values); use a torque wrench when required. 7. Reconnect and test any electrical components (lock, lamp, winch) to confirm proper operation if present. 8. Check that the spare is secure by attempting to move it by hand and verify tire pressure again. 9. Tip: lightly coat exposed threads with anti-seize or corrosion inhibitor and recheck fastener tightness after a short drive.
- Q:
Why choose Toyota Parts Deal
- Dedicated Service
Your complete satisfaction is our #1 goal
- Lowest Prices
Best deals on genuine OE parts from dealerships
- Fast Delivery
Orders are processed and delivered promptly