My Garage
Cart
Make sure this part fits

Toyota 13050-0V040 Gear Assembly, CAMSHAFT

2011-2019 Toyota 130500V040

Customer Questions & Expert Answers (6)
Toyota 13050-0V040 Gear Assembly, CAMSHAFT
  • Part Description
    Gear Assy, Camshaft Timing
  • Part Name Code
    13050
  • Replaces
    13050-0V030, 13050-0V070, 13050-36030
  • Manufacturer
    Toyota
Make sure this part fits
$259.24 MSRP: $371.72
You Save: $112.48 (31%)
1
ADD TO CART
  • Related Parts
  • Product Specifications
  • Vehicle Fitment
  • Customer Questions & Expert Answers
  • Product Specifications

    BrandGenuine Toyota
    Part Name Code13050
    Manufacturer Part Number13050-0V040
    Part DescriptionGear Assy, Camshaft Timing
    Other NamesActuator, Camshaft Gear, Intake Gear
    Item Dimensions10.2 x 8.6 x 7.2 inches
    Item Weight1.70 Pounds
    ConditionNew
    Fitment TypeDirect Replacement
    Replaces13050-0V030, 13050-0V070, 13050-36030
    ManufacturerToyota
    SKU13050-0V040
    WarrantyThis genuine Toyota part is guaranteed by Toyota's factory warranty.
    Shipping & ReturnShipping Policy Return Policy
    Warning: California's Proposition 65
  • Vehicle Fitment

    Year Make Model Trim & Engine Important vehicle option details
    2011-2016 Scion tC4 Cyl 2.5L2ARFE; AGT20L-ALFGKA, AGT20L-ALFGKK, AGT20L-ALTGKA, AGT20L-ALTGKK
    2012-2017 Toyota CamryLE, N, SE, XLE, XSE|4 Cyl 2.5L, 6 Cyl 3.5L2ARFE, 2ARFXE, 2GRFE; ASV50L-CETEKA, ASV50L-CETGKA, ASV50L-CETNKA, ASV50L-CETPKA, ASV50L-CETSKA, AVV50L-CEXGBA, AVV50L-CEXNBA, AVV50L-CEXSBA, GSV50L-CETGKA, GSV50L-CETSKA
    2011-2019 Toyota HighlanderLimited, Medium, STD, Sport|4 Cyl 2.7L, 6 Cyl 3.5L1ARFE, 2GRFE, 2GRFE; ASU40L-ARTNKA, 2GRFKS, 2GRFXE, 2GRFXS; ASU40L-ARTNKA, 2GRFXS; ASU50L-ARTNKA, ASU50L-ARTNKA, GSU40L-ARAGKA, GSU40L-ARAMKA, GSU40L-ARANKA, GSU40L-ARASKA, GSU45L-ARAGKA, GSU45L-ARAMKA, GSU45L-ARANKA, GSU45L-ARASKA, GSU50L-ARTGKA, GSU50L-ARTMKA, GSU50L-ARTNKA, GSU50L-ARZGHA, GSU50L-ARZMHA, GSU50L-ARZNHA, GSU55L-ARTGKA, GSU55L-ARTMKA, GSU55L-ARTNKA, GSU55L-ARZGHA, GSU55L-ARZMHA, GSU55L-ARZNHA, GVU58L-ARXGHA, GVU58L-ARXGKA, GVU58L-ARXMHA, GVU58L-ARXMKA, GVU58L-ARXNHA, GVU58L-ARXNKA
    2011-2018 Toyota RAV4LE, Limited, SE, STD, Sport, X, XLE|4 Cyl 2.5L, 6 Cyl 3.5L2ARFE, 2ARFXE, 2ARFXE; ASA42L-ANTGKA, 2GRFE; ASA33L-ANPGKA, 2GRFE; ASA33L-CNPGKA, ASA33L-ANPGKK, ASA33L-ANPSKA, ASA33L-ANPSKK, ASA33L-ANPXKA, ASA33L-ANPXKK, ASA33L-CNPGKA, ASA33L-CNPGKK, ASA33L-CNPSKA, ASA33L-CNPSKK, ASA33L-CNPXKA, ASA33L-CNPXKK, ASA38L-ANPGKA, ASA38L-ANPSKA, ASA38L-ANPXKA, ASA38L-CNPGKA, ASA38L-CNPGKK, ASA38L-CNPSKA, ASA38L-CNPSKK, ASA38L-CNPXKA, ASA38L-CNPXKK, ASA42L-ANTGKA, ASA42L-ANTMKA, ASA42L-ANTSKA, ASA42L-ANTXKA, ASA42L-CNTGKA, ASA42L-CNTGKK, ASA42L-CNTMKA, ASA42L-CNTMKK, ASA42L-CNTSKA, ASA42L-CNTSKK, ASA42L-CNTXKA, ASA42L-CNTXKK, ASA44L-ANTGKA, ASA44L-ANTMKA, ASA44L-ANTSKA, ASA44L-ANTXKA, ASA44L-CNTGKA, ASA44L-CNTGKK, ASA44L-CNTMKA, ASA44L-CNTMKK, ASA44L-CNTSKA, ASA44L-CNTSKK, ASA44L-CNTXKA, ASA44L-CNTXKK, AVA44L-ANXGBA, AVA44L-ANXGBK, AVA44L-ANXMBA, AVA44L-ANXMBK, AVA44L-ANXSBA, AVA44L-ANXSBK, GSA33L-ANAGKA, GSA33L-ANAGKK, GSA33L-ANASKA, GSA33L-ANASKK, GSA33L-ANAXKA, GSA33L-ANAXKK, GSA33L-CNAGKA, GSA33L-CNAGKK, GSA33L-CNASKA, GSA33L-CNASKK, GSA33L-CNAXKA, GSA33L-CNAXKK, GSA38L-ANAGKA, GSA38L-ANASKA, GSA38L-ANAXKA, GSA38L-CNAGKA, GSA38L-CNAGKK, GSA38L-CNASKA, GSA38L-CNASKK, GSA38L-CNAXKA, GSA38L-CNAXKK
    2011-2014 Toyota SiennaLE, SE, STD, XLE|4 Cyl 2.7L, 6 Cyl 3.5L1ARFE, 2GRFE; ASL30L-PFTEKA, ASL30L-PRTEKA, GSL30L-PFTDKA, GSL30L-PFTEKA, GSL30L-PFTQKA, GSL30L-PRTEKA, GSL30L-PRTQKA, GSL30L-PRTSKA, GSL33L-SBTDKA, GSL35L-PFTDKA, GSL35L-PFTEKA, GSL35L-PFTQKA
    2011-2017 Toyota VenzaN|4 Cyl 2.7L, 6 Cyl 3.5L1ARFE, 2GRFE; AGV10L-AWTGKA, AGV15L-AWTGKA, GGV10L-AWTGKA, GGV15L-AWTGKA
  • Customer Questions & Expert Answers

    Q:
    Does it fit my car? Posted by ToyotaPartsDeal Specialist
    A:
    You can Select Your Vehicle to check if 13050-0V040 fits your vehicle.
    Posted by ToyotaPartsDeal Specialist
    Q:
    How to Remove and Install a Timing Chain and Variable Timing Sprocket in a Four-Cylinder Engine on a Toyota Highlander? Posted by Customer
    A:
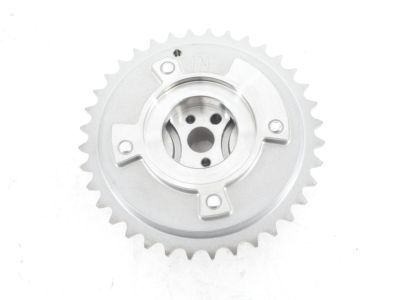
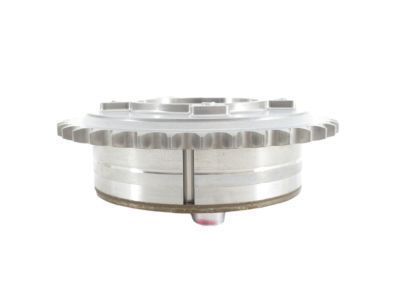
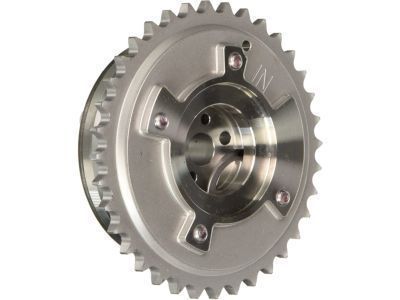
    To remove the components, first disconnect the cable from the negative battery terminal, then remove the drive belt and the alternator. Next, take off the valve cover and the ABS actuator if equipped, ensuring to remove the three gaskets from the camshaft bearing caps on 2008 and later models. With the parking brake applied and the rear wheels blocked, loosen the right front wheel lug nuts, raise the front of the vehicle, and support it securely on jack stands before removing the right front wheel and splash shield. Drain the cooling system while removing the power steering pump without disconnecting the fluid lines, tying it to the body to keep it out of the way. Position the number one piston at TDC on the compression stroke, confirming alignment of the timing mark on the crankshaft pulley with the "0" mark on the timing chain cover and the camshaft sprocket marks with the marks on the camshaft front bearing caps. Remove the crankshaft pulley/vibration damper without rotating the engine from TDC, supporting the engine from above or below. Remove the passenger side engine mount and movement control rod, followed by the drive belt tensioner(s) and the crankshaft position sensor from the timing chain cover, along with the bolt securing the wiring harness. Detach the main wiring harness junction and remove the timing chain tensioner from the rear side of the timing chain cover, then pry off the cover after removing the fasteners. Slide the crankshaft position sensor reluctor ring off the crankshaft, remove the timing chain tensioner pivot arm/chain guide, and lift the timing chain off the camshaft sprockets, removing the timing chain and crankshaft sprocket as an assembly. For 2008 and later models, remove the movement control rod mounting bracket from the front of the timing chain cover, then remove the cover fasteners and pry off the cover. Remove the O-rings from the crankcase, the top chain guide mounting bolt and guide, and extend the tensioner plunger until a pin can be inserted into the alignment holes. Remove the mounting bolts and the timing chain tensioner, followed by the timing chain tensioner pivot arm/chain guide and the stationary timing chain guide. Lift the timing chain off the camshaft sprockets and remove the timing chain and crankshaft sprocket as an assembly. To remove the camshaft sprockets, loosen the bolts while holding the hex on the camshaft with a wrench, noting the identification marks before removal. Visually inspect all parts for wear and damage, checking the timing chain for loose pins, cracks, worn rollers, and side plates, as well as the sprockets for hook-shaped, chipped, and broken teeth. Measure the timing chain for stretching and the diameter of the timing sprockets for wear, replacing them as necessary. Check the chain guides for excessive wear and inspect the chain guide oil hole for clogging. For installation, remove all traces of old sealant from the timing chain cover and the mating surfaces, position the camshafts with the dowel pins at the top, and install both camshaft sprockets in their original locations. Ensure the TDC marks on the camshaft sprockets are aligned, install the stationary timing chain guide, loop the timing chain around the crankshaft sprocket, and align the No.1 colored link with the mark on the crankshaft sprocket. Slip the timing chain into the lip of the stationary timing chain guide and over the exhaust camshaft sprocket, then around the intake camshaft sprocket, aligning the remaining colored links with the marks on the camshaft sprockets. Remove slack from the chain and install the timing chain tensioner pivot arm/chain guide, ensuring the tab on the pivot arm can't move past the stopper on the cylinder head. Reconfirm that the number one piston is at TDC and that the timing marks are aligned. Install the crankshaft position sensor reluctor ring with the "F" mark facing outward, apply RTV sealant to the timing chain cover sealing surfaces, and install the cover with bolts in their original locations, tightening them evenly. Reload and lock the timing chain tensioner, lubricate the O-ring, and install the tensioner into the timing chain cover. Install the crankshaft pulley/vibration damper, rotate the engine counterclockwise slightly to set the chain tension, and for 2008 and later models, temporarily install the crankshaft pulley bolt and rotate the crankshaft counterclockwise until the keyway is pointing to the 10 o'clock position. Align the TDC marks on the camshaft sprockets, install the stationary timing chain guide, loop the timing chain around the exhaust camshaft sprocket, and align the yellow-colored link with the timing mark. Guide the chain into the stationary chain guide, align the crankshaft sprocket with the pink-colored link, and slip the timing chain around the intake camshaft sprocket. Rotate the crankshaft clockwise until the keyway is pointing to the 12 o'clock position, install the tensioner guide and mounting bolt, then install a new gasket and the tensioner. Confirm that the number one piston is still at TDC and that the timing marks are aligned, install the top chain guide mounting bolt and guide, apply RTV sealant to the timing chain cover sealing surfaces, and install the cover with bolts in their original locations. Tighten the bolts in sequence, install the movement control rod mounting bracket, and tighten the bolts. Finally, rotate the engine clockwise at least two revolutions and reposition the number one piston at TDC, visually confirming the alignment of the timing marks. The remainder of the installation follows the reverse of removal.
    Posted by ToyotaPartsDeal Specialist
    Q:
    How to Remove and Install a Timing Chain and Variable Timing Sprocket on a Toyota Rav4? Posted by Customer
    A:
    Position the number one piston at TDC on the compression stroke, confirming alignment of the timing mark on the crankshaft pulley/vibration damper with the "O" mark on the timing chain cover and the camshaft sprocket marks with the marks on the camshaft front bearing caps. Remove the crankshaft pulley/vibration damper without rotating the engine from TDC, and if it does rotate, reposition it back to TDC. Next, take off the drive belt tensioner and crankshaft position sensor from the timing chain cover, along with the bolt securing the wiring harness. Remove the oil pan, then take out the timing chain cover mounting fasteners and carefully pry the cover off from several locations, noting the different sizes of the mounting bolts for reassembly. Once the cover is off, remove the O-rings from the crankcase, followed by the top chain guide mounting bolt and guide. Let the tensioner plunger extend until a 0.06 inch (1.5 mm) pin can be inserted into the alignment holes of the stopper plate and the tensioner, then release the tensioner ensuring the pin is secured. Remove the mounting bolts and the timing chain tensioner, then take out the timing chain tensioner pivot arm/chain guide and the stationary timing chain guide. Lift the timing chain off the camshaft sprockets and remove the timing chain and crankshaft sprocket as an assembly from the engine, ensuring to mark the front of the chain if it will be reused. To remove the camshaft sprockets, loosen the bolts while holding the lug on the camshaft with a wrench, noting the identification marks before removal. Visually inspect all parts for wear and damage, checking the timing chain for loose pins, cracks, worn rollers, and side plates, as well as the sprockets for hook-shaped, chipped, and broken teeth. Measure the timing chain for stretching and the diameter of the timing sprockets for wear, replacing them as a set if necessary. Check the chain guides for excessive wear and replace them if scoring or wear exceeds acceptable limits. Remove all traces of old sealant from the timing chain cover and the mating surfaces of the engine block and cylinder head. Position the camshafts with the dowel pins at the top, then install both camshaft sprockets in their original locations, applying medium strength thread locking compound to the bolt threads and tightening them while holding the camshaft. Temporarily install the crankshaft pulley bolt and rotate the crankshaft until the keyway is pointing to the 10 o'clock position, then align the TDC marks on the camshaft sprockets. Install the stationary timing chain guide, loop the timing chain around the exhaust camshaft sprocket aligning the yellow colored link with the timing mark, and guide the chain into the stationary chain guide while aligning the crankshaft sprocket with the pink colored link. Slip the timing chain around the intake camshaft sprocket, rotating the camshaft counterclockwise to align the timing mark and colored link before installing the chain onto the sprocket teeth. Remove the string holding the chain to the crankshaft sprocket, rotate the crankshaft clockwise until the keyway is at the 12 o'clock position, and install the tensioner guide and mounting bolt. Install a new gasket and the tensioner with the mounting bolts, tightening them and allowing the plunger to contact the tensioner guide. Confirm the number one piston is still at TDC and that the timing marks are aligned with the colored links on the chain. Install the top chain guide mounting bolt and guide, apply RTV sealant to the timing chain cover sealing surfaces, place the cover in position, and install the bolts in their original locations, tightening them evenly. Install the passenger's side mounting bracket to the front of the timing chain cover and tighten the bolts in sequence. Install the crankshaft pulley/vibration damper, rotate the engine clockwise at least two revolutions, and reposition the number one piston at TDC, visually confirming the alignment of the timing marks. The remainder of installation follows the reverse order of removal.
    Posted by ToyotaPartsDeal Specialist
    Q:
    What components need to be removed during the procedure for the 2014 Toyota Camry? Posted by Customer
    A:
    Components such as the crankshaft pulley/vibration damper and timing chain cover need to be removed during the procedure.
    Posted by ToyotaPartsDeal Specialist
    See expert answers on similar Variable Timing Sprocket
    Q:
    This part is a new combined number make up on several other parts. I just want to know I get all the needed part in this parts combined number or just the gear. Posted by Customer
    A:
    this is just 1 gear, nothing else included? your VIN 13050 0V011
    Posted by ToyotaPartsDeal Specialist 10/5/2018
    Q:
    I'm trying to find the right cam gear for my car. Your site lists the proper number as 13050-0V10, however the Toyota Service Bulletin T-SB-0041-13 list the current part as 13050-0V040. Can you confirm this is the proper number. Also I have the same issue with part# 11159-36010. That is the number you list but the Service Bulletin list the current part as 11159-0V011 can you confirm this is the proper part also. Posted by Customer: 2010 Toyota Camry
    A:
    According to Toyota TSB-0041-13 with the VIN# provided, PN 13050-0V040 is the correct update from PN 13050-0V010. 11159-0V011 whould be the correct update from PN 11159-36010.
    Posted by ToyotaPartsDeal Specialist 5/5/2017
    If you have any questions about this product, please don't hesitate to ask us. We will be happy to help you!

Genuine Toyota Part 13050-0V040, the Right Choice

Get the reliability of purchasing Toyota part # 13050-0V040 Gear Assembly, CAMSHAFT. It is also referred to as Cam Gear, Variable Timing Sprocket. The first option should always be to use OEM parts. Toyota manufactures these components with high quality material and rigorously tested with high reliability and durability. This part fits 2012-2017 Camry, 2011-2019 Highlander, 2011-2018 RAV4, 2011-2014 Sienna.

ToyotaPartsDeal.com is a leading supplier of genuine Toyota parts and accessories, such as 130500V040 Gear Assembly, CAMSHAFT. In need of OEM Toyota parts? We offer a wide selection of genuine parts available that are competitively priced and trusted across the market. All parts are warranted by the manufacturer. Combine that with our simple return policy and fast delivery service and your shopping experience will be stress-free and dependable. For detailed Toyota parts information, click here.

Why choose Toyota Parts Deal

  • Dedicated Service

    Your complete satisfaction is our #1 goal

  • Lowest Prices

    Best deals on genuine OE parts from dealerships

  • Fast Delivery

    Orders are processed and delivered promptly