My Garage
Cart
Make sure this part fits

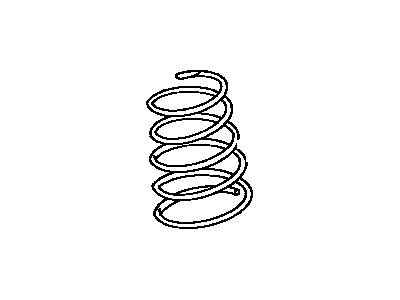
Toyota 48131-1B791 Spring, Front Coil, RH

1986-1988 Toyota Supra 481311B791

Customer Questions & Expert Answers (4)
Toyota 48131-1B791 Spring, Front Coil, RH
  • Part Description
    Spring, Front Coil, RH
  • Part Name Code
    48131
  • Position
    Passenger Side
  • Replaced By
    48131-1D070
  • Manufacturer
    Toyota
Make sure this part fits
$70.36 MSRP: $99.19
You Save: $28.83 (30%)
Ships in 1-3 Business Days
1
ADD TO CART
  • Related Parts
  • Product Specifications
  • Vehicle Fitment
  • Customer Questions & Expert Answers
  • Product Specifications

    BrandGenuine Toyota
    Part Name Code48131
    Manufacturer Part Number48131-1B791
    Part DescriptionSpring, Front Coil, RH
    Item Dimensions15.5 x 7.1 x 5.9 inches
    Item Weight7.10 Pounds
    PositionPassenger Side
    ConditionNew
    Fitment TypeDirect Replacement
    ManufacturerToyota
    SKU48131-1B791
    WarrantyThis genuine Toyota part is guaranteed by Toyota's factory warranty.
    Shipping & ReturnShipping Policy Return Policy
    Warning: California's Proposition 65
  • Vehicle Fitment

    Year Make Model Trim & Engine Important vehicle option details
    1986-1988 Toyota Supra6 Cyl 3.0L7MGE, 7MGTE; MA70L-BJMVFA, MA70L-BJMVFK, MA70L-BJMVZA, MA70L-BJMVZK, MA70L-BJPVFA, MA70L-BJPVFK, MA70L-BJPVZA, MA70L-BJPVZK, MA70L-BLMVFA, MA70L-BLMVFK, MA70L-BLMVZA, MA70L-BLMVZK, MA70L-BLPVFA, MA70L-BLPVFK, MA70L-BLPVZA, MA70L-BLPVZK
  • Customer Questions & Expert Answers

    Q:
    Is the above part number correct or is there another correct number for my car? Posted by ToyotaPartsDeal Specialist
    A:
    You can Select Your Vehicle to check if 48131-1B791 fits your vehicle.
    Posted by ToyotaPartsDeal Specialist
    Q:
    How to replace front Coil Springs and Shock Absorber on Toyota Supra? Posted by Customer
    A:
    If the shock absorbers, struts, or coil springs are leaking fluid, worn out, or physically damaged, before proceeding, check all possible alternatives because once there is a problem with the strut/shock absorber assembly, the entire assembly must be replaced. Springs can be incorporated in the strut assemblies and may be available in exchange, therefore, it prove useful to cost and consider the availability of parts when disassembling the vehicle. Start by removing the shock absorber or strut and spring assembelage, and clamp it in a wooden padded vise. Fit a spring compressor on this bearing following the manufacturer's procedures and compress a spring until pressure is fully released and can be checked by reshaping the spring. Using a screwdriver or prybar to hold the suspension support and damper rod from turning, use a socket wrench to and turn the damper rod nut counterclockwise. Pull out the nut and suspension support, examining the moving parts of the bearing and the rubber; if the latter has perished or is worn out, replace with a new one. Remove the spring seat and upper insulator from the damper shaft and inspect rubber spring seat and if it is damaged, replace it. After holding onto the end carefully, this lifted the compressed spring off the assembly, being cautious to avoid the end. Remove the rubber bumper and dust boot with reference to the damper rod by sliding it and inspect the lower insulator for signs of wear and replace those that are worn. To assemble the strut, get the dust boot, and rubber bumper and stretch the damper rod to add maximum length while putting the components downwards. If replacing the lower insulator, properly install it in its seat. Sit the coil spring onto the lower insulator such that ends of it fit into the recess. Next, fit another insulator and place the spring seat on; the flat of the damper rod should fit in the upper flats of the spring seat, and the ''out'' mark should face the lower bracket. Last but not the least, fit back the dust seal and suspension support on the damper rod, tighten the nut in conformity to the torque specifications, and finally drop in the strut/ shock absorber & coil spring set up.
    Posted by ToyotaPartsDeal Specialist
    Q:
    How to remove and install front Coil Springs and Shock Absorber on 1987 and later on Toyota Supra? Posted by Customer
    A:
    Although shock absorbers don't always fail or wear out simultaneously, it is advisable to replace both front shocks at the same time to prevent handling peculiarities and abnormal ride quality. Begin by loosening the front wheel lug nuts, raising the vehicle, and securely supporting it on jackstands. Remove the wheel and place a floor jack under the lower control arm. Next, remove the upper control arm, followed by the stabilizer link mounting nut to separate the stabilizer bar from the link. For models equipped with Toyota Electronic Modulated Suspension, select the SPORT mode on the switch, remove the actuator cover retaining screws, and lift the actuator from its mounting bracket, disconnecting the electrical connector and removing the bolts. Loosen the three upper mount-to-shock tower retaining nuts without removing them completely, and if the upper mount is to be removed from the shock absorber/coil spring assembly, also loosen the center nut. Remove the shock-to-lower control arm nut and bolt, then separate the shock absorber/coil spring assembly from the lower control arm. Remove the shock tower-to-upper mount nuts and take out the shock absorber/coil spring assembly from the vehicle. For installation, if the upper mount was removed, place it over the top of the new shock absorber/coil spring assembly and install the nut. Guide the assembly into position in the wheel well, pushing the upper mount studs through the holes in the shock tower, and install the three nuts, tightening them to the specified torque. Attach the shock absorber/coil spring assembly to the lower control arm, ensuring the nut is tightened securely. Reinstall the upper control arm, connect the stabilizer link to the spindle, and tighten the upper mount nut and the three upper mounting nuts to the specified torque. For models with Toyota Electronic Modulated Suspension, attach the actuator to the mounting bracket, aligning the flats on the actuator rod with the slot in the shock absorber, ensuring the actuator position is horizontal to the alignment holes. Finally, remove the jack from under the lower control arm, install the wheel, lower the vehicle, and tighten the lug nuts to the specified torque.
    Posted by ToyotaPartsDeal Specialist
    Q:
    What is the first step in the installation process of the strut assembly for the 1986 Toyota Supra? Posted by Customer
    A:
    To install the strut and coil spring assembly, reverse the removal procedure.
    Posted by ToyotaPartsDeal Specialist
    See expert answers on similar Coil Springs
    If you have any questions about this product, please don't hesitate to ask us. We will be happy to help you!

Genuine Toyota Part 48131-1B791, the Right Choice

Get the reliability of purchasing Toyota part # 48131-1B791 Spring, Front Coil, RH. It is also referred to as Coil Springs. The first option should always be to use OEM parts. Toyota manufactures these components with high quality material and rigorously tested with high reliability and durability. This part fits 1986-1988 Supra.

ToyotaPartsDeal.com is a leading supplier of genuine Toyota parts and accessories, such as 481311B791 Spring, Front Coil, RH. In need of OEM Toyota parts? We offer a wide selection of genuine parts available that are competitively priced and trusted across the market. All parts are warranted by the manufacturer. Combine that with our simple return policy and fast delivery service and your shopping experience will be stress-free and dependable. For detailed Toyota parts information, click here.

Why choose Toyota Parts Deal

  • Dedicated Service

    Your complete satisfaction is our #1 goal

  • Lowest Prices

    Best deals on genuine OE parts from dealerships

  • Fast Delivery

    Orders are processed and delivered promptly