
Why choose ToyotaPartsDeal
- High-Grade Parts
The best site to buy Toyota Land Cruiser genuine parts for years has been ToyotaPartsDeal.com. We're the best online store for genuine parts. Toyota Land Cruiser parts you could ever need are available here at the finest quality and best value on the web that will have your vehicle performing past its limits.
- Value For Money
What makes us the best choice for OEM Toyota Land Cruiser parts? You get tremendous savings because our goal is to offer unbeatable prices. At ToyotaPartsDeal.com, Our products offer the same performance and reliability as their OEM counterparts without having to break your wallet.
- Quick Delivery
Everything you need for routine maintenance and repair can be found in our complete Toyota Land Cruiser parts catalog. Having the best OEM parts inventory available, the parts for your vehicle will arrive fast no matter your location in the nation. You'll be back on the open road before you know it.
Popular Genuine Toyota Land Cruiser Parts
- Power Train/Chassis Parts View More >
- Body Parts View More >
- Engine/Fuel/Tool Parts View More >
- Electrical Parts View More >


Shop Genuine Toyota Land Cruiser Parts with ToyotaPartsDeal.com
The Toyota Land Cruiser is a range of FWD vehicles from Japanese automaker Toyota. It is considered one of the most challenging environments in terms of both temperature and terrain. The Toyota Land Cruiser was eventually lowered but still featured a three-speed main gearbox. By 1968, 100,000 units had been sold worldwide. The one-piece front axle was upgraded with coil springs. The rear springs were lengthened to improve ride comfort and wheel travel. The six-pin wheels were replaced with five-pin wheels. Minor changes were made to the gearbox to improve its durability. The long-wheelbase models were given new names. The Toyota Land Cruiser was originally imported to Australia by B&D Motors as FJ25/28 with cab chassis. By 1965, more than 50,000 vehicles had been produced worldwide. The Land Cruiser was Toyota's best-selling vehicle in the United States. In 1974, the 3.0-liter, four-cylinder diesel B engine was introduced. The introduction of this engine boosted sales in Japan and made the Toyota Land Cruiser a compact truck with lower taxes than the gasoline version. In 1976, the FJ40 and FJ55 were equipped with front disc brakes.
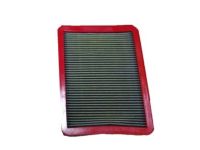
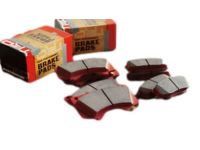
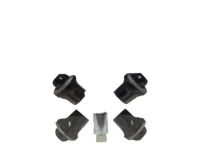
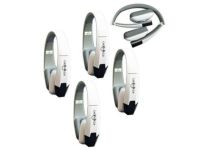
Toyota Land Cruiser, a popular SUV often driven in harsh road conditions, may encounter several common issues over time, impacting its engine, braking system, cooling system, and other components. Firstly, drivers may notice blue smoke, increased oil consumption, or sudden engine stoppage. These issues, often indicated by decreased power and acceleration, rough idling, misfiring, or the illumination of the Check Engine Light, can stem from a faulty EGR valve, spark plug, oil filter, fuel filter, or drive belt. Secondly, the Land Cruiser's braking system may prematurely fail, resulting in noisy brakes, poor brake response, or pulsating brake pedals, usually due to a worn brake pad set, brake disc, or brake drum. Cooling system failures are also common, primarily affecting the radiator, radiator hose, and thermostat gasket. The SUV's suspension system may encounter issues with components like bell housing and sway bar bushing. Other daily-use parts like the seat belt, wheel seal, and cabin air filter also require regular attention, as any issues with these parts can significantly affect the driving experience.
Choosing OEM products can lead to long-term cost savings on maintenance and repairs since they offer the highest level of durability, thanks to their strict manufacturing processes. Wondering where to get high-quality and affordable OEM Toyota Land Cruiser parts? You have already come to the right place. We offer all genuine Toyota Land Cruiser parts at the lowest prices with a manufacturer's warranty. All our parts make it to you in a short amount of time due to our fast shipping times. Our professional customer service staff is ready to help you with any problems during your shopping experience. Please enjoy your shopping!
Toyota Land Cruiser Parts Questions & Answers
- Q: What are the Precautions and Maintenance Tips for Toyota Land Cruiser Car Batteries?A:If your stereo has an anti-theft system, ensure you have the activation code before disconnecting the battery. Also, remove the battery from the vehicle when charging to prevent paint damage. Slow-rate charging is best for the battery's charge. Avoid high amperage chargers or rapid boost charges. Check for overheating during charging.
- Q: How to replace a headlight on Toyota Land Cruiser?A:Disconnect the negative cable from the battery, ensuring you have the correct activation code for the stereo if it has an anti-theft system. Remove the headlight trim bezel and the turn signal assembly on FJ62 models. When replacing a headlight, avoid turning the spring-loaded adjusting screws to maintain the aim. Remove the screws securing the retaining ring and withdraw it while supporting the light. Pull the headlight out slightly and disconnect the electrical connector, then remove the light from the vehicle. Position the new unit to connect the electrical connector, ensuring the numbers molded into the lens are at the top. Install the retaining ring with its mounting screws and spring, then check the headlights for proper operation and adjustment; if the adjusting screws were not altered, no adjustment is needed. Install the radiator grille. For halogen bulb types, reach behind the headlight assembly to unplug the electrical connector, grasp the bulb holder securely, and rotate it counterclockwise to remove it from the housing. Pull straight out on the bulb to remove it from the bulb holder, and without touching the glass, insert the new bulb assembly into the headlight housing. Finally, plug in the electrical connector, test headlight operation, and close the hood.
- Q: How to remove and install a starter motor in a Toyota Land Cruiser?A:To remove the starter/Starter Solenoid assembly, start by detaching the battery's negative terminal and ensure the correct activation code for the stereo's anti-theft system. Remove the engine compartment's Car Batteries and disconnect the cruise control assembly. Detach electrical connectors from the starter/solenoid assembly. Then, remove starter motor mounting bolts, including the top one, and the upper section's bracket if needed. Installation is the reverse of removal.
- Q: How to remove and install the intake manifold and Exhaust Manifold in Pushrod engine on Toyota Land Cruiser?A:To completely take out the intake manifold, one should first switch off the car power by removing the negative cable from the battery connector if at all the car has a radio system it should be activated with the correct code if it is an anti-theft system. Remove the coolant from the car and unbolt any varieties of coolant hoses associated with the intake manifold. Carbureted models need you to remove the carburetor while the fuel injected models need the air intake plenum to be removed. Then, take off the air injection pump and manifold, next, disconnect the bolt keeping the intake manifold-to-exhaust manifold bracket in place and take out the bracket. For fuel-injected models remove the fuel hose from the fuel rail. Modifications include; the removal of the heat shields at the exhaust manifold to get to the mounting nuts, removal of the power steering pump with the power steering hoses still connected, removal of the throttle valve linkage if at all it is connected and the removal of the EGR tube from the manifolds. Unbolster the nuts and bolts that connect the exhaust pipe to the exhaust manifold; use penetrating oil if needed and, if so, the oxygen sensor electrical connection as well. Last, but not least, undo the mounting bolts, nuts, and spacer to take off the manifolds from the engine. For installation, clean the mating surfaces, move such parts as may be required to the new manifold if you are replacing, place the new replacement gasket onto the cylinder head and finally fit the manifolds. Finally, you have to rotate the bolts in sequence from the center towards the ends to the required torque, replace the rest of the parts in reverse, and starts the engine for leakage check and functionality.


