My Garage
Cart
Make sure this part fits

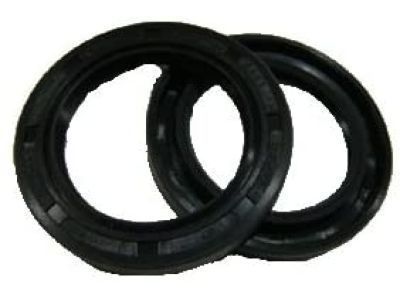
Toyota 90311-A0005 Seal, Oil

1984-2022 Toyota 90311A0005

Customer Questions & Expert Answers (19)
Toyota 90311-A0005 Seal, Oil
  • Part Description
    Seal, Oil(For Timing Gear Case Or Timing Chain Case)
  • Part Name Code
    11301C
  • Comment
    (FOR TIMING GEAR CASE OR TIMING CHAIN CASE)
  • Replaces
    90311-42019, 90311-42007, 90311-42037, 90311-42036
  • Manufacturer
    Toyota
Make sure this part fits
$18.92 MSRP: $26.45
You Save: $7.53 (29%)
Ships in 1-3 Business Days
1
ADD TO CART
  • Related Parts
  • Product Specifications
  • Vehicle Fitment
  • Customer Questions & Expert Answers
  • Product Specifications

    BrandGenuine Toyota
    Part Name Code11301C
    Manufacturer Part Number90311-A0005
    Part DescriptionSeal, Oil(For Timing Gear Case Or Timing Chain Case)
    Item Dimensions5.3 x 4.8 x 1.0 inches
    Item Weight0.50 Pounds
    ConditionNew
    Fitment TypeDirect Replacement
    Replaces90311-42019, 90311-42007, 90311-42037, 90311-42036
    ManufacturerToyota
    SKU90311-A0005
    WarrantyThis genuine Toyota part is guaranteed by Toyota's factory warranty.
    Shipping & ReturnShipping Policy Return Policy
    Warning: California's Proposition 65
  • Vehicle Fitment

    Year Make Model Trim & Engine Important vehicle option details
    2003-2009 Toyota 4RunnerLimited, SR5|6 Cyl 4.0L, 8 Cyl 4.7L1GRFE, 2UZFE; GRN210L-GKAGKA, GRN210L-GKAZKA, GRN210L-GKPGKA, GRN210L-GKPZKA, GRN215L-GKAGKA, GRN215L-GKAZKA, GRN215L-GKPGKA, GRN215L-GKPZKA, UZN210L-GKAGKA, UZN210L-GKAZKA, UZN215L-GKAGKA, UZN215L-GKAZKA
    2005-2018 Toyota AvalonLimited, XL, XLE, XLE Premium, XLE Touring Or Touring, XLS|4 Cyl 2.5L, 6 Cyl 3.5L2ARFXE, 2GRFE; AVX40L-AEXGBA, 2GRFE; GSX30L-AEAGKA, AVX40L-AEXPBA, GSX30L-AEAGKA, GSX30L-AEANKA, GSX30L-AEAPKA, GSX30L-AETGKA, GSX30L-AETNKA, GSX30L-AETPKA, GSX40L-AETGKA, GSX40L-AETPKA, GSX40L-AETQKA
    2007-2017 Toyota CamryLE, N, SE, XLE, XSE|4 Cyl 2.4L, 4 Cyl 2.5L, 6 Cyl 3.5L2ARFE, 2ARFXE, 2AZFE, 2GRFE; ACV40L-AEAGKA, 2GRFE; ACV40L-CEAGKA, ACV40L-AEANKA, ACV40L-AEMNKA, ACV40L-CEANKA, ACV40L-CEASKA, ACV40L-CEMNKA, ACV40L-CEMSKA, ASV40L-AETGKA, ASV40L-AETNKA, ASV40L-CEFNKA, ASV40L-CEFSKA, ASV40L-CETGKA, ASV40L-CETNKA, ASV40L-CETSKA, ASV50L-CETEKA, ASV50L-CETGKA, ASV50L-CETNKA, ASV50L-CETPKA, ASV50L-CETSKA, AVV50L-CEXGBA, AVV50L-CEXNBA, AVV50L-CEXSBA, GSV40L-AETGKA, GSV40L-AETNKA, GSV40L-CETGKA, GSV40L-CETNKA, GSV40L-CETSKA, GSV50L-CETGKA, GSV50L-CETSKA
    2007-2010 Toyota FJ Cruiser6 Cyl 4.0L1GRFE; GSJ10L-GKASKA, GSJ15L-GKASKA, GSJ15L-GKFSKA
    2008-2017 Toyota HighlanderGrande, Limited, Medium, STD, Sport|4 Cyl 2.7L, 6 Cyl 3.3L, 6 Cyl 3.5L1ARFE, 2GRFE, 2GRFKS, 2GRFXE, 2GRFXS; ASU40L-ARTNKA, 3MZFE; ASU40L-BRTNKA, ASU50L-ARTNKA, GSU40L-ARAGKA, GSU40L-ARAMKA, GSU40L-ARANKA, GSU40L-ARASKA, GSU40L-BRAGKA, GSU40L-BRAMKA, GSU40L-BRANKA, GSU40L-BRASKA, GSU45L-ARAGKA, GSU45L-ARAMKA, GSU45L-ARANKA, GSU45L-ARASKA, GSU45L-BRAGKA, GSU45L-BRAMKA, GSU45L-BRANKA, GSU45L-BRASKA, GSU50L-ARTGKA, GSU50L-ARTMKA, GSU50L-ARTNKA, GSU50L-ARZGHA, GSU50L-ARZMHA, GSU50L-ARZNHA, GSU55L-ARTGKA, GSU55L-ARTMKA, GSU55L-ARTNKA, GSU55L-ARZGHA, GSU55L-ARZMHA, GSU55L-ARZNHA, GVU48L-BRXGKA, GVU48L-BRXNKA, GVU58L-ARXGHA, GVU58L-ARXGKA, GVU58L-ARXMHA, GVU58L-ARXMKA, GVU58L-ARXNHA, GVU58L-ARXNKA, MHU48L-BRXMKA, MHU48L-BRXNKA
    2008-2021 Toyota Land Cruiser8 Cyl 5.7L3URFE; URJ200L-GNTEKA, URJ200L-GNZVKA
    2006-2012 Toyota RAV4Limited, STD, Sport, X|4 Cyl 2.4L, 4 Cyl 2.5L, 6 Cyl 3.5L2ARFE, 2AZFE, 2GRFE; ACA33L-ANPGKA, 2GRFE; ASA33L-CNPGKA, ACA33L-ANPGKK, ACA33L-ANPSKA, ACA33L-ANPSKK, ACA33L-ANPXKA, ACA33L-ANPXKK, ACA38L-ANPGKA, ACA38L-ANPSKA, ACA38L-ANPXKA, ASA33L-ANPGKA, ASA33L-ANPGKK, ASA33L-ANPSKA, ASA33L-ANPSKK, ASA33L-ANPXKA, ASA33L-ANPXKK, ASA33L-CNPGKA, ASA33L-CNPGKK, ASA33L-CNPSKA, ASA33L-CNPSKK, ASA33L-CNPXKA, ASA33L-CNPXKK, ASA38L-ANPGKA, ASA38L-ANPSKA, ASA38L-ANPXKA, ASA38L-CNPGKA, ASA38L-CNPGKK, ASA38L-CNPSKA, ASA38L-CNPSKK, ASA38L-CNPXKA, ASA38L-CNPXKK, GSA33L-ANAGKA, GSA33L-ANAGKK, GSA33L-ANASKA, GSA33L-ANASKK, GSA33L-ANAXKA, GSA33L-ANAXKK, GSA33L-CNAGKA, GSA33L-CNAGKK, GSA33L-CNASKA, GSA33L-CNASKK, GSA33L-CNAXKA, GSA33L-CNAXKK, GSA38L-ANAGKA, GSA38L-ANASKA, GSA38L-ANAXKA, GSA38L-CNAGKA, GSA38L-CNAGKK, GSA38L-CNASKA, GSA38L-CNASKK, GSA38L-CNAXKA, GSA38L-CNAXKK
    2008-2022 Toyota SequoiaLimited, Platinum, SR5|8 Cyl 4.6L, 8 Cyl 4.7L, 8 Cyl 5.7L1URFE, 2UZFE, 3URFBE, 3URFE; UCK60L-GKALKA, UCK60L-GKASKA, UCK65L-GKALKA, UCK65L-GKASKA, UPK60L-GKTLKA, UPK60L-GKTSKA, UPK65L-GKTLKA, UPK65L-GKTSKA, USK60L-GKTLKA, USK60L-GKTSKA, USK60L-GKTZKA, USK65L-GKTLGA, USK65L-GKTLKA, USK65L-GKTSGA, USK65L-GKTSKA, USK65L-GKTZGA, USK65L-GKTZKA
    2006-2017 Toyota SiennaCE, LE, SE, STD, XLE|4 Cyl 2.7L, 6 Cyl 3.3L, 6 Cyl 3.5L1ARFE, 2GRFE, 2GRFKS, 3MZFE; ASL30L-PFTEKA, 3MZFE; GSL20L-PFADKK, ASL30L-PRTEKA, GSL20L-PFADKK, GSL20L-PFAEKA, GSL20L-PFAEKK, GSL20L-PFAQKA, GSL20L-PFAQKK, GSL20L-PRADKK, GSL20L-PRAEKA, GSL20L-PRAEKK, GSL20L-PRAQKA, GSL20L-PRAQKK, GSL23L-SBADKA, GSL23L-SBADKK, GSL25L-PFADKK, GSL25L-PFAEKA, GSL25L-PFAEKK, GSL25L-PFAQKA, GSL25L-PFAQKK, GSL30L-PFTDKA, GSL30L-PFTEKA, GSL30L-PFTQKA, GSL30L-PFZDHA, GSL30L-PFZEHA, GSL30L-PFZQHA, GSL30L-PRTEKA, GSL30L-PRTQKA, GSL30L-PRTSKA, GSL30L-PRZEHA, GSL30L-PRZQHA, GSL30L-PRZSHA, GSL33L-SBTDKA, GSL33L-SBZDHA, GSL33L-SEZDHA, GSL35L-PFTDKA, GSL35L-PFTEKA, GSL35L-PFTQKA, GSL35L-PFZEHA, GSL35L-PFZQHA, MCL20L-PFADKK, MCL20L-PFAEKA, MCL20L-PFAEKK, MCL20L-PFAQKA, MCL20L-PFAQKK, MCL20L-PRADKK, MCL20L-PRAEKA, MCL20L-PRAEKK, MCL20L-PRAQKA, MCL20L-PRAQKK, MCL23L-SBADKA, MCL23L-SBADKK, MCL25L-PFADKK, MCL25L-PFAEKA, MCL25L-PFAEKK, MCL25L-PFAQKA, MCL25L-PFAQKK
    2005-2016 Toyota TacomaBase, Limited, SR5|4 Cyl 2.7L, 6 Cyl 3.5L, 6 Cyl 4.0L1GRFE, 2GRFKS, 2TRFE; GRN225L-CRFDKA, GRN245L-CRADKA, GRN245L-CRFDKA, GRN245L-PRADKA, GRN245L-PRFDKA, GRN250L-PRADKA, GRN265L-CRADKA, GRN265L-CRFDKA, GRN265L-PRADKA, GRN270L-PRADKA, GRN305L-CRFSHA, GRN305L-CRTSHA, GRN305L-PRFSHA, GRN305L-PRTLHA, GRN305L-PRTSHA, GRN310L-PRTLHA, GRN310L-PRTSHA, GRN325L-CRTSHA, GRN325L-PRTLHA, GRN325L-PRTSHA, GRN330L-PRTLHA, GRN330L-PRTSHA, TRN220L-TRMDKA, TRN220L-TRPDKA, TRN225L-CRMDKA, TRN225L-CRPDKA, TRN225L-PRPDKA, TRN240L-TRMDKA, TRN240L-TRPDKA, TRN245L-CRMDKA, TRN245L-CRMSKA, TRN245L-CRPDKA, TRN245L-CRTSKA, TRN260L-TRMDKA, TRN265L-CRMDKA, TRN265L-CRPDKA, TRN265L-CRTSKA, TRN265L-PRPDKA, TRN265L-PRTSKA
    View More
  • Customer Questions & Expert Answers

    Q:
    I would like to know availability and if it is direct fit replacement Posted by ToyotaPartsDeal Specialist
    A:
    You can Select Your Vehicle to check if 90311-A0005 fits your vehicle.
    Posted by ToyotaPartsDeal Specialist
    Q:
    How to replace the front crankshaft seal in V6 engine on Toyota Sequoia? Posted by Customer
    A:
    Remove the crankshaft pulley. First, delicately extract the threaded part of the timing chain cover using a screwdriver or seal removing tool;. Second, you should remove the lip on the crankshaft seal. If using an ordinary metallic screwdriver, it is wise to cover the tip of the screwdriver to avoid inexperienced scratching of such housing bore or hasty harming of the crankshaft which may lead to leakage with the new seal that has been fixed. Clean the bore in the timing chain cover, applying engine oil or multi-purpose grease, to the lip and outer edges of a new seal. Using a seal driver or placing a socket having a diameter slightly less than the diameter of the seal into it, gently force the new seal into its seat with a hammer taking care to see that the seal is placed squarely and flush with the surface of of the timing chain cover. Do this and you will be sure that your seal is in the right position and the spring installed as well. Replace the crankshaft pulley and fasten the bolt tightening it to the standard torque. Last but not the least, start the engine and look for the oil traces at the front seal.
    Posted by ToyotaPartsDeal Specialist
    Q:
    How Should the Crankshaft Seal Be Properly Installed on a Toyota Sienna? Posted by Customer
    A:
    The crankshaft should be installed first, followed by bolting the bearing caps or cap assembly in place. Next, install the new Crankshaft Seal in the retainer and bolt the retainer to the block. Carefully inspect the seal contact surface on the crankshaft for any scratches or nicks that could damage the new seal lip and lead to oil leaks; if damaged, a new or different crankshaft is necessary. To remove the old seal from the retainer, drive it out from the back side using a hammer and punch after supporting the retainer on wood blocks. Note how far the old seal is recessed into the bore, as the new Crankshaft Seal must be recessed the same amount, taking care not to damage the bore to prevent oil leaks. Ensure the retainer is clean, then apply a thin coat of engine oil to the outer edge of the new Crankshaft Seal, pressing it squarely into the bore without hammering. If a press is unavailable, use two smooth pieces of wood and a large vise to press the seal into place, ensuring even force distribution. As a last resort, the seal can be tapped into the retainer with a hammer using a block of wood to distribute the force evenly, ensuring it is driven in squarely. Before slipping the Crankshaft Seal/retainer over the crankshaft and bolting it to the block, lubricate the seal lips with clean engine oil or multi-purpose grease, applying a 3/32-inch wide bead of anaerobic sealant to the retainer-to-block surface instead of using a gasket. Finally, tighten the bolts gradually.
    Posted by ToyotaPartsDeal Specialist
    Q:
    How to replace the rear crankshaft seal without damaging it in four cylinder engine on 2005 through 2009 Toyota Tacoma? Posted by Customer
    A:
    Remove the transmission and the rear end plate. The Crankshaft Seal can be replaced without removing the oil pan or seal retainer, but this method is not recommended due to the stiffness of the seal lip, which may lead to improper installation or damage. If proceeding, pry out the old Crankshaft Seal with a screwdriver, apply multi-purpose grease to the crankshaft seal journal and the lip of the new Crankshaft Seal, and carefully press the new seal into place, ensuring not to rush to avoid damage. A recommended method involves removing the seal retainer and resealing the rear of the oil pan. After removing the two rearmost oil pan-to-seal retainer bolts, break the seal between the rear of the oil pan and the bottom of the seal retainer with a putty knife, then remove the retainer-to-engine block bolts, detach the seal retainer, and clean off all old gasket material and sealant from the oil pan flange, covering the open area with clean rags to keep debris out. Position the Crankshaft Seal and retainer assembly between two wood blocks on a workbench and drive the old seal out from the back side with a screwdriver. Drive the new Crankshaft Seal into the retainer using a wood block or a section of pipe, ensuring it is not cocked in the retainer bore. Lubricate the crankshaft seal journal and the lip of the new Crankshaft Seal with multi-purpose grease, position a new gasket on the engine block, and apply a bead of RTV sealant to the exposed portion of the oil pan flange, particularly at the pan-to-block mating surface. Slowly and carefully push the Crankshaft Seal and retainer onto the crankshaft, using a smooth object to assist with the stiff seal lip, and install and tighten the retainer bolts to the specified torque. The remainder of the installation follows the reverse order of removal.
    Posted by ToyotaPartsDeal Specialist
    Q:
    How to replace the rear crankshaft seal in V8 engine on Toyota Tundra? Posted by Customer
    A:
    This procedure is in the assumption that the engine has been pulled out from the vehicle. Start with the disconnection of the transmission together with the driveplate. It is not necessary to detach the oil pan or the seal retainer if the task is to replace the Crankshaft Seal; the easiest tool is the seal-removal tool. If this tool is not available, one can also use a sharp knife with a view of removing the lip from the old seal without scratching the crankshaft. After stripping off the lip, one can use a screwdriver with the tape around it, to ease out the seal. Then, apply multi-purpose grease to the crankshaft seal journal and the lip of the new seal as well. Push the new Crankshaft Seal into the retainer straight utilizing a wood block or a piece of pipe that is slightly smaller in diameter to the outer diameter of the seal so that the seal will not be cocked in the retainer bore. I placed the new seal as flat as I could with the retainer so it should look something like this: Last but not the least, uninstall the program by following the reverse procedure of the removal process.
    Posted by ToyotaPartsDeal Specialist
    Q:
    How can the oil seal be removed from the rear of the engine for the 2013 Toyota Camry? Posted by Customer
    A:
    Pry the oil seal from the rear of the engine with a screwdriver.
    Posted by ToyotaPartsDeal Specialist
    See expert answers on similar Crankshaft Seal
    Q:
    How can the new seal be driven into place for the 2007 Toyota Camry? Posted by Customer
    A:
    The new seal can be driven into place using a seal driver or a large socket and a hammer. It is important to ensure that the seal enters the bore squarely and stops when the front face is at the proper depth.
    Posted by ToyotaPartsDeal Specialist
    See expert answers on similar Crankshaft Seal
    Q:
    What should be checked after installing the new seal for the 2011 Toyota Camry? Posted by Customer
    A:
    Check the seal after installation to make sure the spring didn't pop out of place.
    Posted by ToyotaPartsDeal Specialist
    See expert answers on similar Crankshaft Seal
    Q:
    How should the new seal be driven into the retainer for the 2012 Toyota Camry? Posted by Customer
    A:
    The new seal should be driven into the retainer with a wood block or a section of pipe, ensuring that it is not cocked in the retainer bore. The new seal should be approximately flush with the surface of the retainer.
    Posted by ToyotaPartsDeal Specialist
    See expert answers on similar Crankshaft Seal
    Q:
    What is the final step in the process for the 2010 Toyota Highlander? Posted by Customer
    A:
    Install the transaxle to the engine.
    Posted by ToyotaPartsDeal Specialist
    See expert answers on similar Crankshaft Seal
    Q:
    What should you do before installing the new seal for the 2016 Toyota Highlander? Posted by Customer
    A:
    Apply clean engine oil or multi-purpose grease to the outer edge of the new seal.
    Posted by ToyotaPartsDeal Specialist
    See expert answers on similar Crankshaft Seal
    Q:
    How should the crankshaft seal journal and the new seal be prepared for the 2016 Toyota Highlander? Posted by Customer
    A:
    The crankshaft seal journal and the lip of the new seal should be lubricated with multi-purpose grease.
    Posted by ToyotaPartsDeal Specialist
    See expert answers on similar Crankshaft Seal
    Q:
    What is the next step after installing the new seal for the 2009 Toyota Sienna? Posted by Customer
    A:
    Reinstall the crankshaft pulley, tightening the bolt.
    Posted by ToyotaPartsDeal Specialist
    See expert answers on similar Crankshaft Seal
    Q:
    What should be done after positioning the retainer for the 2010 Toyota Sienna? Posted by Customer
    A:
    Install and tighten the retainer bolts. Ensure that the bottom sealing flange of the retainer does not extend below the bottom sealing flange (oil pan rail) of the block.
    Posted by ToyotaPartsDeal Specialist
    See expert answers on similar Crankshaft Seal
    Q:
    How should the seal be removed from the timing chain cover for the 2007 Toyota Tacoma? Posted by Customer
    A:
    Carefully pry the seal out of the timing chain cover with a screwdriver or seal removal tool, being careful not to scratch the crankshaft. If using a screwdriver, wrap tape around the tip to avoid scratching the housing bore or damaging the crankshaft, as damage to the crankshaft can cause the new seal to leak.
    Posted by ToyotaPartsDeal Specialist
    See expert answers on similar Crankshaft Seal
    Q:
    What should be done after removing the old seal for the 2008 Toyota Tacoma? Posted by Customer
    A:
    Clean the bore in the cover and coat the outer edge and the lip of the new seal with engine oil or multi-purpose grease.
    Posted by ToyotaPartsDeal Specialist
    See expert answers on similar Crankshaft Seal
    Q:
    What should be done after positioning the retainer for the 2006 Toyota Tacoma? Posted by Customer
    A:
    Install and tighten the retainer bolts to the specified torque.
    Posted by ToyotaPartsDeal Specialist
    See expert answers on similar Crankshaft Seal
    Q:
    What is the method for removing the seal from the engine for the 2007 Toyota Tundra? Posted by Customer
    A:
    Carefully pry the seal out of the engine with a screwdriver or seal removal tool. If using a screwdriver, wrap tape around the tip to avoid scratching the housing bore or damaging the crankshaft.
    Posted by ToyotaPartsDeal Specialist
    See expert answers on similar Crankshaft Seal
    Q:
    How should I install the new seal into the retainer for the 2008 Toyota Tundra? Posted by Customer
    A:
    Drive the new seal into the retainer using a wood block or a section of pipe that is slightly smaller in diameter than the outside diameter of the seal. Ensure that you do not cock the seal in the retainer bore.
    Posted by ToyotaPartsDeal Specialist
    See expert answers on similar Crankshaft Seal
    If you have any questions about this product, please don't hesitate to ask us. We will be happy to help you!

Genuine Toyota Part 90311-A0005, the Right Choice

Get the reliability of purchasing Toyota part # 90311-A0005 Seal, Oil. It is also referred to as Crankshaft Seal. The first option should always be to use OEM parts. Toyota manufactures these components with high quality material and rigorously tested with high reliability and durability. This part fits 2003-2009 4Runner, 2007-2017 Camry, 2008-2017 Highlander, 2005-2016 Tacoma.

ToyotaPartsDeal.com is a leading supplier of genuine Toyota parts and accessories, such as 90311A0005 Seal, Oil. In need of OEM Toyota parts? We offer a wide selection of genuine parts available that are competitively priced and trusted across the market. All parts are warranted by the manufacturer. Combine that with our simple return policy and fast delivery service and your shopping experience will be stress-free and dependable. For detailed Toyota parts information, click here.

Why choose Toyota Parts Deal

  • Dedicated Service

    Your complete satisfaction is our #1 goal

  • Lowest Prices

    Best deals on genuine OE parts from dealerships

  • Fast Delivery

    Orders are processed and delivered promptly